 |
Autumn Still Life
By Jackie, oil pastel on paper |
I just love the amazing colors of fall, so as an artist I'm always looking for new ways depict them in our artwork.
In the past we have utilized watercolor, colored pencil, pastel, and tempera paint for our fall-themed still life art.
This time, we created these stunning autumn-themed still life artworks with oil pastels on black sulfite paper. Here's how we did it: |
| Our selected still life elements |
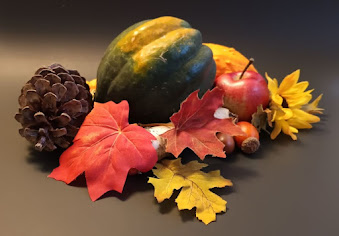
The still life. First, we collected a variety of fall-themed objects with which to build our still life model. We couldn't use everything, so we selected the most interesting objects, making sure to choose a variety of sizes, colors, and textures.
 |
| The final still life arrangement |
Next, the still life elements were arranged on a seamless 'stage' (such as a poster board) to create the still life model, and a good light source was set up for distinct shadows and highlights.
The sketch. Once everything was in place, the artists chose a pleasing vantage point from which to observe the model, and sketch in the basic shapes on a piece of 9" x 12" black sulfite paper. We use Tru-Ray, which is a high grade construction paper that is very black in color and resistant to fading. Use soft pastels (white or black) instead of pencil for sketching on sulfite paper because it can be easily wiped away with a soft dry rag - no eraser needed. The palette. Our next step was to observe the model, carefully taking note of each color. A green acorn squash might have three or four different greens in it (ours did), so create your palette by pulling each possible green color from your oil pastel set, holding it up and comparing it to what you see in the object. If the color is the same, or very similar, set it aside. You are creating a specific palette for this pastel painting. Continue choosing pastel sticks until you have compiled your still life palette and keep your palette colors separated from your remaining set until the artwork is completed.
The painting process. Now you can proceed to fill in your still life elements with color, always observing shapes, textures, colors, shadows, and highlights. Some of your colors will need to be layered, and some of your marks will be laid heavily, others with a very light touch. It can also help to have a toothpick available to scrape in lines and texture, such as in these leaves.
The shadows. The final step is laying in black soft pastel beneath the still life to create shadows. Simply fill in the areas and softly blend in and away from the still life using your finger. Then, stand back, observe carefully, and make any needed adjustments to your artwork.
Notes: You may have noticed that, although using the same model, the above two pieces are painted from two very different vantage points. Also, one artist chose not to include the pine cone, and some of the leaves are rearranged in the artworks. These pieces were painted by adults, but can be painted by younger artists as well.
For more autumn-themed pastel (and mixed media) paintings by younger students, take a look at our previous weblog posts, here and here.


