Friday, January 31, 2020

Animals in Snugly Sweaters


Demery's Bunny in a Sweater


Our forest animals are snugly warm in these colorful sweaters! (Yes, these are snugly, not ugly sweaters, mind you.)


This entire project is done in ink, with the exception of the lightly penciled in animal shape, which is erased after the image is inked in.


After sketching in the animal's head, and the neck and shoulders of the sweater, the facial features and fur are added to the head with Sharpies. 


Next, using the fine point Sharpie, the sweater is designed starting with the shape of the collar and adding horizontal lines across the sweater (curved slightly to show the shape of the body).


Then patterns are added between the lines, such as zigzags, swirlies, dots, stripes, and simple shapes like trees and snowflakes. 

Now it is time to carefully fill in the sweater patterns with brightly colored Crayola or watercolor markers.

Last step: erase all pencil marks with a big soft eraser.
Sara's Wolf in a Sweater
Alyssa's Fox in a Sweater

Asean'ee's Raccoon in a Sweater

Bear in a Sweater 
Raccoon in a Sweater 

Thursday, January 30, 2020

Playful Messy Fun!


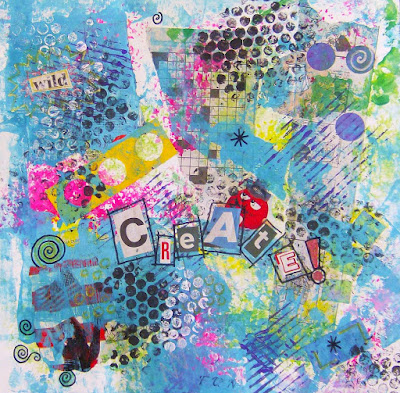
Have you seen the PSAs about the "Genius of Play?" Creating ART is all about play! This project was about making abstract art - and having playful fun at the same time!

We compared objective art, which is pictures of objects and living things, and abstract art - or non-objective art - which we decided is fun to make and fun to look at. In other words: PLAY! 


We used many techniques to make this mixed media abstract art. We started by gluing torn newspaper comics and puzzles to our substrate - which is a 15" x 15" piece of poster board. Then we sponged over it slightly with any color (tinted with white). We then used a brayer to roll on a second tinted color. 


Next, we looked through some magazines and tore or cut out interesting pictures that conveyed "play" in some way, and we arranged and glued them into our composition. We also looked for big, fun letters to use to spell words with. 

Now it was time to add more paint, so we sponged on one more color. 


Then we cut or punched out a few squares or dots from construction paper and glued them somewhere into the artwork.


Next, we used corrugated cardboard and bubble wrap to add a few patterned prints in darker colors and white.


Then we choose a few words to represent our theme of "play." 

Words we thought of as a group were play, playful, mess, messy, create, fun, funny, art, make, have fun, games... you get the idea.


We cut out and added the letters of our chosen words to the composition. 

Last step: DOODLE! 

We used Sharpies and glitter pens to add doodles, swirls, patterns and even secret messages. 


And this is why abstract art is so much fun to look at - you see something new every time you look at it!
 These last three are demonstrations that I made along with our young artists.
If I mixed all of them up, could you tell which are mine? 

These painted abstract collages were created by artists 
6 to 15 years of age.

Wednesday, January 29, 2020

Jen Aranyi-Themed Painting


This beautiful mixed media artwork is created in the style of Jen Aranyi, a contemporary graphic artist and illustrator. 


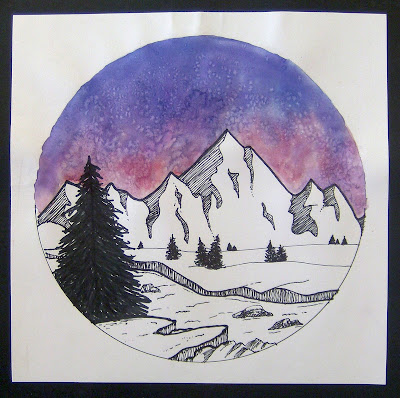
One of her favorite outdoor subjects is mountainscapes, such as these wintery art pieces created by our students in her style.


These watercolor and ink compositions can be created within non-traditional shapes such as triangles and circles. (Jen uses organic and animal shapes as well, but we decided to keep it simple for our first attempt.)


We started by deciding the shape that we will work within, which we drew lightly with a pencil using a ruler or by tracing a pie tin. 

We then sketched in a jagged line approximately across the middle, making sure it wasn't too regular or zig-zaggy.


It needed to be uneven like the Sawtooths in Idaho. Then we filled in the sky with watercolor, wet-in-wet. We started with the lightest color along the top of the mountains and worked our way up, blending analogous colors and ending with our darkest color. Some added salt to the wet paint.

Once the paint was dry, we outlined the top of the mountains with our fine point Sharpie. Then we used our ultra-fine Sharpie to create rugged edges on each mountain peak. We learned to use hatching and stippling techniques to show shapes, textures, and shadows. 

At this point, artists could choose to add a little stream or a depict a snow covered hilly landscape. Both were equally dramatic.

Next, evergreen trees were added to help to create the illusion of distance. Notice the most of the distant trees are mere dots! 


We then traced a Sharpie line around the bottom of the circular compositions, and we erased any pencil marks with a big soft eraser. Those who did not add salt now used white acrylic paint on the tip of a skewer to add stars to the sky. Then, after everything was dry, we cut out the triangular pieces and we mounted all of our artwork on black poster board for added emphasis. 


Jeanette created the mountainscape below in her art journal 
using soft pastels to add color her sky.

 These last four, shown below, are my samples/demos. 
(Okay, YES, I admit it! I really LOVE making these!) 

These works of art were created by artists ages 6 through adult.