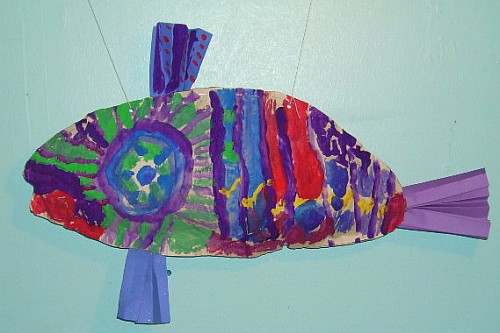
 In the previous post, you may have noticed one of our little artists working hard on her "fat fish." This project was a big hit with the younger crowd in our Art is Fun! class. It's fun to construct this big fat fish, but even more fun to paint it. Best of all, when you hang it from the ceiling, it "swims" through the ocean-air (especially with a good breeze). One thing children really like this fish is the size - nearly two feet from the mouth to the tip of the tail!
The fabulous fish above was designed and painted by 6-year-old Lindy.
This project does take a lot of preparation, but little ones enjoy doing their jobs: stuffing and especially painting this big fat fish.
How to Make Colorful Fat Fish
Materials:
Newspaper or large roll or sheets of plain newsprint
Colored construction paper
White glue
Stapler
Tempera paints in separate plastic containers, ready to use
Assorted brushes
Paint smocks
Masking tape
Old pie tins (palettes)
Large water containers
Plastic knives (palette knives)
Paper towels
Newspapers for table
Felt tipped markers
Pictures or paintings of colorful tropical fish
Completed Fat Fish sample (go ahead, make one!)
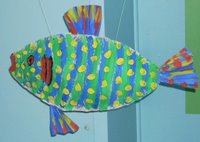
Four-year-old Erik used bold shapes and colors in his lovely tropical fish design, above.
What to do:
Preparation (to make one fish) - Add a small amount of water to some white glue. Fold 2 single sheets of newspaper or newsprint (cut to newspaper size) in half and glue halves together. Use a one-inch paint brush to spread glue, for best results. Allow to dry. Using a black marker, draw a large fish shape on one of the above folded and glued sheets. Layer it on top of the other glued sheet, and cut out the fish shape. Glue the edges of the two fish pieces together, leaving five or six inches open along the top. Allow to dry. Tear several sheets of newspaper into small (6 x 6 inch) squares for the children to crumple for use as stuffing. Accordion pleat two lengths of construction paper, four and six inches wide, to cut up and use as fins and tails.Cover table with newspapers. Set out paints, brushes, and filled water containers.
1) Talk with your child about the different kinds of fish and share pictures and/or paintings of colorful fish. Your fat fish sample could be hanging from the ceiling near the table.
2) First your child will stuff the fish. While you check the glued edges and staple together any gaps, have your child loosely crumple newspaper squares, then carefully stuff the crumpled newspaper into the fish. Be sure to stuff newspaper into the head and tail areas. When the fish is nice and fat, staple the opening closed.
3) Now, staple the six-inch accordian pleat to the fish, creating a "fan" tail. Cut the other pleated paper in half and staple a "fin" to the top and another to the bottom of the fish.
4) Time to put on a paint smock and paint that fish! Encourage your child to think about colors and patterns and scales. Refer to the fish sample and pictures of fish.
5) Pour various colors of paint into the pie tin palettes. Show your child how to clean brushes between colors, and encourage him/her to mix new colors. Will the fish have stripes, spots, or wavy patterns? Remember to paint the gills, eyes, and mouth. You can cut out an eye from construction paper to glue to the fish when the painting is done if desired.
6) While the fish dries, your child can ad stripes or spots to the fins and tails to match the body of the fish. Your child can also paint new colors on top of old once the first layer is dry. Use a blow drier to speed up the drying process if necessary.
7) Once it is completely dry, punch two holes in the top of the fish and hang from the ceiling using string or fishing line. Hang two or three together for a spectacular school of beautiful, drifting fish!
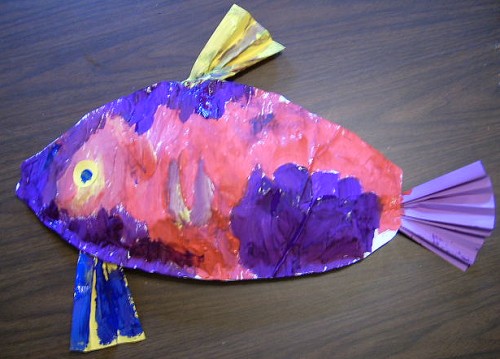
Here's the sample fat fish that I made before class: (Don't laugh! The kids loved it!)
No comments:
Post a Comment