Sunday, June 25, 2006

Paint a WILD Animal

Children love to paint. They also love to look at, learn about, and draw animals. So why not paint their favorite wild animals? Our Art Adventurists loved this project, and the painted and stamped "frames" really gave their pieces a nice finished look.

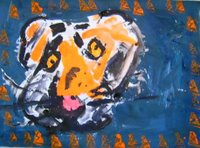
To the right are two paintings of a tiger. Neither was drawn first; the children just dove right in and painted, with spectacular results. Don't you agree?

"Tiger" by 8-year-old George,
(above) and "Smiling Tiger,"
by 7-year-old Kelly

Paint Wild Animals in Tempera

Materials:

Heavy sketch paper, watercolor paper, or other appropriate paper, 11 x 14 or larger
Tempera paints, each color in its own covered plastic container
Assorted brushes
Assorted foam stamps (small - you can make your own)
Old pie tins (palettes)
Large water containers
Plastic knives (palette knives)
Paint smock
Paper towels
Newspapers
Pencils
Books / magazines with good color pictures (art or photos) of wild animals (Zoo Books are great)
A prepared stack of good color photographs of wild animals in their natural surroundings, cut from National Geographic, old calendars, etc.
Sample animal painting with stamped frame (if you have one)

Preparation:

Cover table with newspapers. Set out covered paints, brushes, and filled water containers. Soft margerine tubs are great for paint and water. Set out paper on table and photos for children to look through. Display the sample painting.

What to do:

1) Talk about wild animals and your child's favorites. Look through books and /or magazines at wild animals and how they are depicted.

2) Now look through the photos and have your child choose an animal that he would like to paint. (Use individual photos instead of books or magazines so that if paint is splattered on them it won't matter - plus photo cutouts are easier to work with than an open book.) Explain that the photo is a reference only; that is, its purpose is to help him remember what the animal looks like. He needn’t copy it exactly; in fact he may change the background, the number of animals, or anything else he wishes.
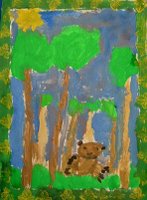
"Lion Cub" by 7-year-old Ashley

3) Put on painting smock.

4) Two rules for painting: Cover the paper surface completely with paint (don’t leave large white areas unpainted); and paint the frame last. (Show sample painting as an example.)

5) Here is the basic procedure for painting:

a) Visualize your composition on the paper first; pencil it in if you like.
b) Decide what colors you will need. Remember, you will be mixing your own colors as needed.
c) Scoop small amounts of basic paint colors from paint containers onto your pie plate palette with a plastic knife.
d) Wipe knife with moist paper towel between each color. That way you will not contaminate the other colors.
e) Mix the colors you need for your painting on your palette using your knife or your brush.
f) While painting, clean your brushes often in the water containers. Don’t let paint dry in brushes. Use paper towels to remove excess water from brushes.
g) Use the blow dryer to quickly dry areas that you want to paint over with contrasting details.

6) After you have completed your painting and washed out your brushes, use a wide (1/2” to 1”) brush and carefully paint a border around the outside of the painting, using a color that complements your painting.

7) After it dries, select a foam stamp that goes well with the theme of your painting (African safari? Woods? Prairie? Beach?) You can easily make your own foam stamps by cutting them from craft foam. Cut out simple designs like zigzags, crescents, or basic shapes like triangles, stars, and dots.

8) Chose a paint color that stands out from your frame color and spread thinly on the newspaper. LIGHTLY press the stamper into the paint, test on clean newspaper a few times, then stamp your frame. You can do this several times before reloading with paint. Leave equal amounts of space between each stamped design.

9) Allow to dry, then display on your wall!
Saturday, June 17, 2006

Paint a Colorful Fat Fish!

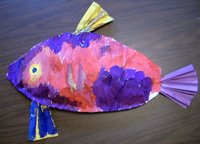
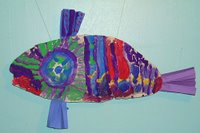
In the previous post, you may have noticed one of our little artists working hard on her "fat fish." This project was a big hit with the younger crowd in our Art is Fun! class. It's fun to construct this big fat fish, but even more fun to paint it. Best of all, when you hang it from the ceiling, it "swims" through the ocean-air (especially with a good breeze). One thing children really like this fish is the size - nearly two feet from the mouth to the tip of the tail!

The fabulous fish above was designed and painted by 6-year-old Lindy.

This project does take a lot of preparation, but little ones enjoy doing their jobs: stuffing and especially painting this big fat fish.

How to Make Colorful Fat Fish

Materials:

Newspaper or large roll or sheets of plain newsprint
Colored construction paper
White glue
Stapler
Tempera paints in separate plastic containers, ready to use
Assorted brushes
Paint smocks
Masking tape
Old pie tins (palettes)
Large water containers
Plastic knives (palette knives)
Paper towels
Newspapers for table
Felt tipped markers
Pictures or paintings of colorful tropical fish
Completed Fat Fish sample (go ahead, make one!)

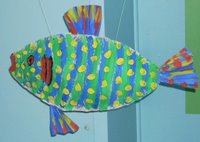
Four-year-old Erik used bold shapes and colors in his lovely tropical fish design, above.

What to do:

Preparation (to make one fish) - Add a small amount of water to some white glue. Fold 2 single sheets of newspaper or newsprint (cut to newspaper size) in half and glue halves together. Use a one-inch paint brush to spread glue, for best results. Allow to dry. Using a black marker, draw a large fish shape on one of the above folded and glued sheets. Layer it on top of the other glued sheet, and cut out the fish shape. Glue the edges of the two fish pieces together, leaving five or six inches open along the top. Allow to dry. Tear several sheets of newspaper into small (6 x 6 inch) squares for the children to crumple for use as stuffing. Accordion pleat two lengths of construction paper, four and six inches wide, to cut up and use as fins and tails.Cover table with newspapers. Set out paints, brushes, and filled water containers.

1) Talk with your child about the different kinds of fish and share pictures and/or paintings of colorful fish. Your fat fish sample could be hanging from the ceiling near the table.

2) First your child will stuff the fish. While you check the glued edges and staple together any gaps, have your child loosely crumple newspaper squares, then carefully stuff the crumpled newspaper into the fish. Be sure to stuff newspaper into the head and tail areas. When the fish is nice and fat, staple the opening closed.

3) Now, staple the six-inch accordian pleat to the fish, creating a "fan" tail. Cut the other pleated paper in half and staple a "fin" to the top and another to the bottom of the fish.

4) Time to put on a paint smock and paint that fish! Encourage your child to think about colors and patterns and scales. Refer to the fish sample and pictures of fish.

5) Pour various colors of paint into the pie tin palettes. Show your child how to clean brushes between colors, and encourage him/her to mix new colors. Will the fish have stripes, spots, or wavy patterns? Remember to paint the gills, eyes, and mouth. You can cut out an eye from construction paper to glue to the fish when the painting is done if desired.

6) While the fish dries, your child can ad stripes or spots to the fins and tails to match the body of the fish. Your child can also paint new colors on top of old once the first layer is dry. Use a blow drier to speed up the drying process if necessary.

7) Once it is completely dry, punch two holes in the top of the fish and hang from the ceiling using string or fishing line. Hang two or three together for a spectacular school of beautiful, drifting fish!

Here's the sample fat fish that I made before class: (Don't laugh! The kids loved it!)

REVISED Summer 2006 Class Schedule

We've had quite a busy week!

Session I of the Summer 2006 class schedule began Monday, and nearly every Session I class has filled! Our children's art classes are proving to be so popular, we have decided to add another children's class that will continue through all three summer sessions. We have also made some changes to our photography class schedule, so be sure to take a look (below) if you are interested in these classes.

Sessions 2 and 3 classes are filling up quickly, so please get your registration materials in as soon as possible to reserve a space. Classes sizes are limited to six students. Feel free to contact us about space availability; give us a call or email us at blackfoot_artcenter@yahoo.com.

Class Schedule Changes:
Note: you will find all of these changes on our updated Summer 2006 Class Schedule(pdf).

It's a Snap! Basic Photography 1 has been moved from Session 1 to Session 2.
Days and times remain the same; Tuesdays, 3:00-4:15 pm. (kids 8 and up)
It's a Snap! Basic Photography 2 has been moved from Session 2 to Session 3.
Days and times remain the same; Tuesdays, 3:00-4:15 pm. (kids 8 and up)
Creative Photography 1 has been moved from Session 1 to Session 2.
Days and times remain the same; Saturdays, 10:30-12:00 pm (teens/adults 13 and up)
Creative Photography 2 has been moved from Session 2 to Session 3.
Days and times remain the same; Saturdays, 10:30-12:00 pm (teens/adults 13 and up)

Class Schedule Additions:

New! Our Art Adventures! classes have proven so popular, we've decided to extend each Art Adventures! class to 1-1/2 hours, and we've added a new Art Adventures! class to our summer schedule. The new class will be held on Fridays from 1:00 to 2:30 pm. This class will run every four weeks throughout the summer beginning June 23, 2006. (Three weeks in Session I) Ages 7-12.

Workshop Schedule Changes:

Easier-Than-Tole-Painting Workshop time changed from 10:00 am-2:00 pm to 1:00-5:00 pm. Date remains the same; Saturday, August 26.

Friday, June 02, 2006

Poster Paint Potato Prints

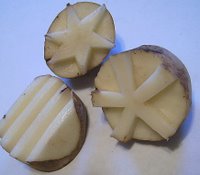
Remember making vegetable prints? I do. I always found the potato to be the best vegetable to work with because the cut suface is large enough to actually cut a nice design into. (Carrots also work, but they are tougher to cut, and have narrower work surface.) If the potato is left unpeeled, it's not so slippery, so it's easier for little fingers to hold onto while cutting and printing.

How to Make Potato Prints

Materials:

Potatoes with skins
Poster or tempera paints
Old pie tins or other suitable paint containers
Old plastic margerine tubs (for water)
Rag or paper towels
Drawing paper / construction paper
Pencils
Small plastic knives, sharp knife
Paint smocks or old shirts
Newspapers

What to do:

1. Cut potatoes in halves or thirds.

2. Draw desired design onto potato with the pencil.

3. Young children can carve simple designs out with the small plastic knives and a little help; but if more detail is preferred, an adult needs to cut around the pencil outline.

4. On newspaper-covered table, pour paint into pie tins, creating a thin layer of each color. Add a bit of water if the paint is thick; it should be like melted ice cream. (This is a good time to mix colors also; mix white and red to make pink, etc.)

5. Press potato design lightly into paint and firmly press onto paper for impression. You'll be able to make several impressions before adding more paint. Practice a couple of times on newspapers to get the feel for how much paint you want on your print. To accomplish a textured effect try letting layers dry and adding prints on top in different colors.

6. To switch colors, teach the children to wash off the potato in the sink or tub of water and blot on the rag or paper towels before using a new color.

7. Experiment with prints on colored construction paper. You can get some really lovely designs and color combinations.

8. What can you make from the finished prints once they are dry? Greeting cards? Wrapping paper? Book covers? Remember, you can cut up your designs and use them to decorate other projects.

If you are interested in signing up for summer classes at the Art Center, scroll down to the Summer 2006 Class Schedule or click here.