Sunday, May 31, 2020

Drawing My Room


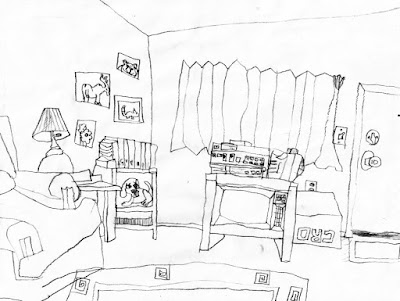
Continuing with Part 3 of our Expanding Drawing Skills series, we're going to draw our living space, or the details of the room that we are in. These types of drawings are called "interiors." 

To draw an interior, all you need are a drawing pencil, a large soft eraser (white is best), and a drawing board if you have one. The drawing board allows you to relax on a couch or chair and set up your drawing surface at a comfortable angle. 


First, observe the room and decide where to start. It often works well to start on one side of the room and work your way to the other side, such as left to right. Try to include as many details as possible. Remember that things nearest you "overlap" objects that are farther away.

Both of the drawings above are of the same living room, but drawn at different times and by a different artist. Can you tell? What parts of the room are the same? What is different?
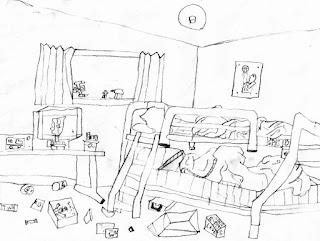

Here is another interior drawing, this time of a bedroom. Is this a clean or a messy room? Is this a boys' or a girls' room? How can details help a drawing tell a story? Would you say that details make a drawing more interesting to look at?
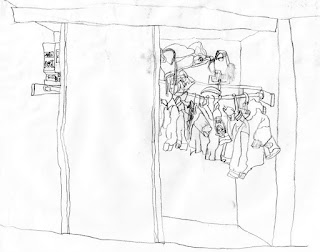


Here is an open closet in the same bedroom. The only thing missing are the shoes! 

(The artist said they were too messy to draw.)

This started out as a centerpiece drawing project from a book called Drawing With Children. The artist then completed the drawing by placing the centerpiece on the table in our kitchen. He added cabinets, drawers, chairs, and even our parakeet, Monet!

This interior drawing shows a corner of a classroom. Notice the toys in the 3-dimensional shelves, the posters on the wall, and the blocks laying on the floor.

When beginning an interior drawing, don't ever decide that the scene in front of you is "too hard." 

Just start drawing, one object at a time. Use a piece of ordinary copy paper or drawing paper and fill it up to all four edges. Don't try to squeeze everything in. Just draw to the edges of the paper as through you are taking picture with a camera. Each time you draw an interior, the next one will be easier for you.  Go ahead, give it a try!

Next: Our favorite Halloween Art Project Ideas you can try at home!

Saturday, May 30, 2020

Drawing from Life


In Part 3 of our Expanding Drawing Skills series, we're going to draw from life

In other words, we'll use our powers of observation to draw what we see!


Do you ever draw the things that you see around you? If so, that's great! If not, let's give it a try. 


Drawing from life helps you to see details that you might not otherwise notice.  You observe how objects are placed in relation to other objects, such as behind or in front of or stacked or beneath or next to other things. 


The best way to get started is to sketch your own belongings - simple things you look at every day.  Use a black marker or Sharpie so that you aren't so worried about erasing "mistakes." Just draw what you see and have fun.


Now let's try some Object Studies.

Find a simple object to draw, such as a roll of masking tape. Draw from as many angles or "view points" as you can: top, side, and three-quarter view (meaning you can see both the top and the side at the same time). Draw these all on the same sheet of paper. 

Try it again with another object, such as this bottle of white glue. See how many views of the object you can find to draw, such as the bottom and a three quarter view of the object laying flat on the table. 


After a bit of practice, it's time for a nature walk! Look for something interesting for an object study; such as this tiny piece of an aspen branch. Can you find a twig, a pine cone, a flower, or an acorn? Use a pencil for this study. It's okay to erase if you need to. 


Let's try drawing something a bit more complex - like toys! If you have any Beanie Babies around, they make great models! You can set up a Beanie Baby any way you want and draw it again and again!


Now let's dig a little deeper. 
For this drawing, grab a small handful of Legos or other tiny toys or figures, and drop them on a table. Observe each piece carefully and draw it. Draw all of your objects on the same page. 

The best way to improve your drawing skills is to keep practicing!
Draw from life every day. Draw whatever you see around you. Draw objects in your desk drawer and on tables and shelves. Draw kitchen utensils and tools and appliances. 

Best of all, draw toys! So much fun! Try drawing a plushy lightly in pencil. Then go over your lines with a Sharpie, adding more details and fuzz. Then erase the pencil with a big soft eraser. 


Next, we'll draw your room and everything in it. Yes. Even if it's messy.

Saturday, May 23, 2020

Storytelling through ART!


Dragons, by Elliott - age 6

In Part 2 of our Expanding Drawing Skills series, let's learn how to tell a story with ART!


Story drawings (also called graphic stories) are a fun way to tell a story using pictures without words.  Your stories can be imaginary or funny or about anything at all that is interesting to you. 


To get started, use your sketchbook to explore ideas. When you come up with something that suggests an interesting story, draw your idea in your sketchbook. Then you can complete your final story to share with your family and friends. Here are some ways to do that: 
Candy Dilemma, by London - age 9


Action Drawing!  Tell a story with just one drawing. For example, what is going on in the exciting drawing above?  Could you tell or write a story about what you see in the drawing? (Using action and small details are great ways to help tell your story!)  
TIP: You can also add words such as dialogue and signs in your artwork, such as in this grocery store scene.


Write a book! Draw a series of pictures that tell your story. Staple the pages together to make a book. Then make an interesting cover. Another way is to make a blank book first, then fill the pages with your story art. You can also write your story on several pages and illustrate each page with your drawings.   


Make your own comics! 
Start by using your sketchbook to find an interesting character to use in your comics. Try lots of ideas!

Now you will need to figure out what your chosen character(s) are going to do. Use your sketchbook to experiment with ideas, such as in this sketch of Biff and Spiff building a blanket "castle" in the living room.

TIP: Your comic can tell a simple story, such as planting a seed, which grows into a tree, which a child climbs to discover a bird nest. Or, it can have a "punchline," which is a little joke at the end. Just remember that your story should have a beginning, a middle, and an end. Remember to try lots of ideas!


Biff and Spiff love music!
To draw your final idea, you will need panels in which to draw each part of your story. You can simply draw the panels* (at least three) or print out these blank comic strip panels. Now all you need to do is draw what happens first, what happens next, and how things finally turn out. 

Bonus! Each time you draw and re-draw your characters, your drawings will improve and you will further develop their unique personalities!

* Of course, you can use more than three panels for a longer story - but often, three panels is all you need!

Click here to download a pdf comic book of Biff and Spiff's crazy adventures!   Notes: Biff and Spiff comic strips were created and drawn by Alicia B. at the age of 12 and published monthly in our home school newsletter, Time for Kids.  Biff and Spiff's adventures are normal ones - like anticipating a dental visit, worrying about school, getting an allowance, surviving an earthquake, taking baths, boredom, and being naughty! 

Here's a Printable Detailed Lesson Guide for this lesson.

Next up, Part 3 of our Expanding Drawing Skills series: Drawing from Life.

Saturday, May 16, 2020

Ready! Set! Action!

Welcome to the first of our children's Expanding Drawing Skills series; an introduction to "Creating ACTION in Art", which provides ideas and methods for adding motion, movement, and action 
to student drawings and artwork.

Have you ever wondered how you can add movement and action 
to your drawings and artwork? 
Take a look at this video to help you get started!


Now it's YOUR turn! 

The projects in this lesson will help you build your drawing skills and make your drawings more interesting and exciting by adding action and motion. Choose the projects that look interesting to you, or try them all. Let’s get started!

You'll need your sketchbook (or several pieces of copy paper) and drawing media of your choice, such as graphite pencil, colored pencils, crayons, markers, etc. Optional: It might be fun to draw your moving animals or figures on a long strip of paper (or several pieces of paper taped together).

Project 1: Jump, Dance, Spin Around!
Remember our earlier Fill up Your Paper weblog post, when we filled up a large piece of paper with as many _______ as we could think of? Let’s do this one again with one new rule: each ________ must be doing something or must be in motion! Your subjects can be running, jumping, swimming, standing on their heads, diving, walking on their hands, dancing, spinning, cartwheeling, somersaulting, or anything else! Silliness is encouraged!!!

Project 2: Animals in Action!
Choose a favorite animal or creature that you enjoy drawing and draw it normally. Now, imagine your animal subject doing something interesting, and draw it again. You could draw a horse in a standing position. Now draw the horse rearing or bucking or rolling in the dust. Can your horse walk, trot, or gallop? Use a long strip of paper for this one!


Project 3: Figures in Action!
Choose a human figure that you enjoy drawing and draw him or her as you normally do. Now draw the same figure again in motion. Remember that humans have knees and elbows that bend when in motion (like Batman, below). Remember drawing of the running figure in the video? Make your figure walk, jump, skip, trip over a rock, fall down, get up, and run! You might use a shadow beneath the figure to show when he is not touching the ground! What else can your figure do? Use a long strip of paper for this one to show his or her progression of motion.

Project 4: Heroes in Action!
This is just like Project 3, only this time let your ‘action' figure be a super hero or sports hero! Think about the kinds of ‘extreme’ actions you would see this character doing and draw him or her in action!

Project 5: Planes, Trains, and Cars
How can you add action to a drawing of a vehicle? Could a speeding car be drawn above the road slightly with a shadow beneath it (as in the running figure)? Try drawing its wheels as ovals leaning forward. Could the car have smeared lines behind it to show motion, and a blurry background?

Project 6: It’s a RACE to the Finish!
Draw an action scene that includes everything we’ve learned that could add action and motion to a completed scene. This could be an exciting horse (or animal) race, race cars on a speedway, a military or battle scene, or an action-packed sports scene. Add lots details that depict motion and action! 
Project 7: Make a Flip Book!
Why not make a flip book to show movement and animation? You can use a Post-it notepad for this, or any other paper stapled or clipped together (I like Post-its the best). You’ll draw the first picture on the bottom page. Then flip to the next page for a slightly different drawing. Continue drawing the figure as it completes the action with just a little change in each drawing from one page to the next. Check out this video to see how to do this, while making your own practice flip book.

Click here to download a printable handout of this lesson.

Now you can use ACTION to create story lines for your own COMIC STRIPS!