Sunday, August 27, 2006

Good, Old-Fashioned Play Dough!

One great open-ended art activity is good, old-fashioned play dough: a perfect example of the value of process vs. end result. Our play dough activity sessions have never produced any "end results," unless you count a plastic bag full of colorful squished up blobs of dough.

Play dough, unlike clay, is just what it says: a lovely, soft doughlike substance that you simply play with. Clay is hard and takes time to manipulate, giving the impression that it is to be made into something permanent. Oil based clay, although it lasts, is hard for young children to work with, and it smells. Self-hardening, oven-baked, and kiln hardened clays have a purpose - to design or create something that will be completed, painted or glazed, and displayed.

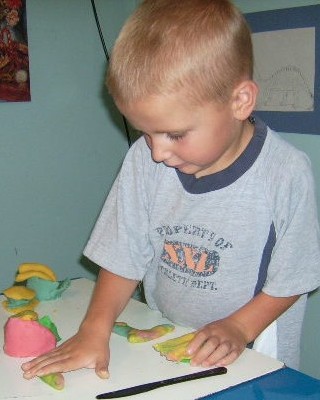
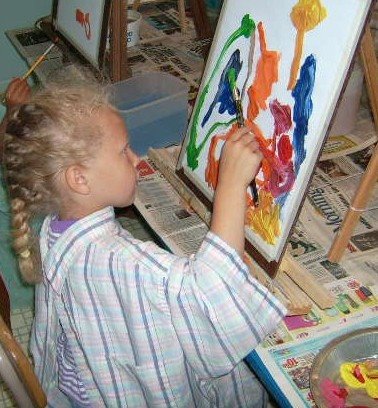
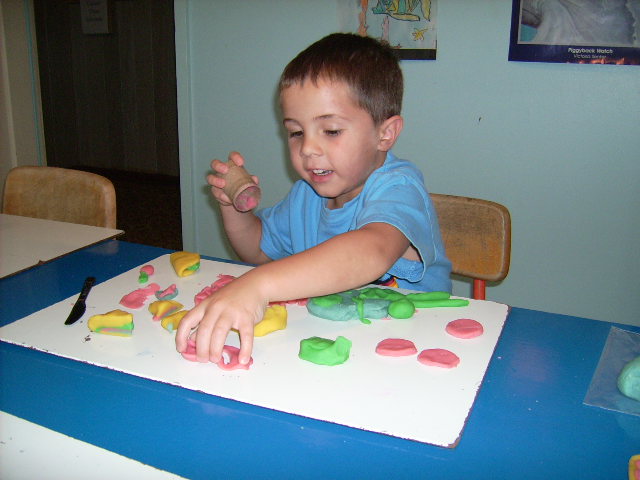
With play dough nothing further is expected, no end-result required. Simply give each child three or four balls of play dough, each a different color. Even the colors are just an added attraction, really. The children are far more interested in the texture of the squishy dough in their hands and between their fingers. They like to manipulate it and to see what they can do with it. I give them a plastic knife for cutting, a cardboard tube for punching holes, and a rolling pin for flattening. Then, I sit quietly at one end of the table and I play with my dough (I get some too). As I work, sometimes they watch what I do, but mostly they come up with their own playful ways of working the dough and using tools. I don't "instruct" them because I want them to explore the material themselves. You can see in these pictures that they are doing just that.

We use a wonderful recipe that takes only a few minutes to make. I make four batches, one each of red (or pinkish), yellow, blue, and green. This dough is not sticky, doesn't smell, and doesn't dry out during use. It will remain soft and flexible after several weeks if stored properly. Here is our recipe:

BETTER-THAN-STORE-BOUGHT PLAY DOUGH

1 cup flour
½ cup salt
1 cup water
1 tablespoon vegetable oil
2 tablespoon cream of tarter
Few drops of food coloring

Mix all ingredients in a pan. Cook over low heat, stirring constantly with a wooden spoon, until mixture pulls away from sides of pan and becomes a large ball. This takes just a minute. Do not over cook. Quickly remove from pan and knead on kitchen counter until smooth. This can be stored in a re-sealable bag in the refrigerator for several months. Note: Double or triple recipe to create several colors.

If you would like more great childrens' craft recipes, you are invited to get your own copy of our ebook, 75 Craft Recipes For Kids: Crafty Concoctions Your Children Will Love! All proceeds from the sale of this ebook go directly to the Blackfoot Art Center, allowing us continue to offer quality art classes and workshops, as well as step-by-step art activities right here in this weblog.

Friday, August 18, 2006

Mosaics of Beans, Seeds, and Pasta

There are many different ways to create a mosaic. With young children, the idea is still the same: provide them with an art activity that is fun and open-ended. Mosaic activity ideas might include furnishing small pre-cut paper squares (no more than one by one inch) of various colors to be glued to a piece of paper; or it might be providing three-dimensional materials to be glued to a stiff backing. These could be man-made objects such as tiles, cut linoleum, or seaglass; or natural objects such as seeds, bark, twigs, seashells, pebbles, and leaves. We decided to create three-dimensional mosaics using dried beans, seeds, and uncooked pastas; such as the one above created by five-year-old McKenzie. Our four- to six-year-olds thoroughly enjoyed this project, so your youngster may enjoy trying it too.

Materials:

Precut corrugated cardboard squares, about 8 x 8 inches each
Seeds, dried beans, and interesting macaroni products, such as:
white beans, black beans, small read beans, pinto beans, black
eyed-peas, split green peas, white rice, spaghetti, Wacky Mac
veggie-shaped pasta
Muffin tin
Meat tray, cleaned and dried
White glue poured in plastic covered container
White glue in original bottle
Water in open container
Small sponge brushes, one for each child
Moist rags (for wiping hands)
Paint smocks or old shirts
Newspapers

Preparation:

Cover table with newspaper. Set out separated seeds and dried beans in muffin tin, pour pasta into meat tray, and place white rice in a disposable cup (for pouring). Place all in center of table. Add one part water to three parts white glue in plastic containers and stir. Place on table (one can be shared by two children) with additional glue in original bottles. Place water container on table for cleaning brushes. Place a piece of cut cardboard and a sponge brush at each child’s place. Put moist rags nearby.

What to do:

1. Talk for a few minutes about the materials on the table. Name the different types of beans and seeds on the table, and talk about the various colors and the differences in size and shape, as well as the various types of macaroni shapes. Introduce “mosaics,” and talk about how can make them using various materials to “paint” pictures.

2. Demonstrate various ways to do this: You can use one type of item (such as black beans or pasta) and a line of glue to outline shapes. You can glue on spaghetti to make straight lines (long or very short). You can fill in areas with glue and a poured material such as split peas or rice. You can glue interesting items around the outer edges. As you can see, six-year-old Lindy used most of these techniques in her mosaic creation.

3. Once the child has a basic understanding of the project, put on paint smocks and let him begin to apply the glue and place the mosaic materials on his project board. Monitor the glue and the other materials. He may use too much glue or simply pour the beans in piles onto the project. Help him to think about what he is doing and remind him that the materials need to be glued on in a single layer so they will stay on when you turn the cardboard sideways (which you should help them do every so often, then re-use any fallen materials).

4. Once your child decides he is finished, make sure he has covered all of the wet glue with mosaic materials. Allow the project to dry. If he would like, let your child select another sheet of cardboard to make another mosaic.

5. Once the mosaic is completely dry, it can be sprayed or painted with a clear glossy acrylic finish.

Saturday, August 05, 2006

Pop-Up Book Workshop and More!

Make a Pop-Up Book, our last children's one-day summer workshop, is just around the corner. Scheduled for Monday, August 14, this workshop will be great fun for kids interested in making their very own bound pop-up book. They will learn several different paper-folding techniques, as well as other interactive methods to surprise and involve the reader. They'll develop a theme or a story-line, build the pop-ups into the book design, and bind the completed book.

This workshop will take place on August 14 from 1 to 5 pm for kids age 7 and up, and will include an energy snack and all supplies and materials. Cost is only $27.00!

Click here to download our Summer 2006 Class Schedule for information about our final session of 2006 summer classes and workshops. This is a PDF file, so you'll need Acrobat Reader to download it. Our Class Registration Form can also be downloaded and printed out. Simply complete and mail or bring it to the Blackfoot Art Center with your class or workshop tuitions.

Session 3 classes begin the week of August 7, so hurry!

Little Painters

Children love to paint. Painting is messy, adventurous, and bold. One uses a brush instead of a fine-pointed writing instrument; strokes are broad and free. In fact, it's the process of painting that is important for young children; it's the playfulness; the motion of the brush dabbing and swirling pigment. The child may attempt to paint a picture, or she may just play with color and design. Painting is great fun!

The availability of easels, smocks, paint palettes, and a variety of brushes allows young children to recognize that they are viewed as trusted, capable artists. At the Blackfoot Art Center, here is how we prepare an open-ended painting activity for four- to six-year-olds:

Materials:

Heavy sketching, drawing or watercolor paper 11 x 14 or larger
Table or child height floor easle
Flat, smooth board such as masonite or sanded plywood (larger than the paper)
Masking tape
Tempera paints, each color in its own covered plastic container
Palettes (we use old pie tins)
Assorted brushes
Large water container
Plastic knives (palette knives)
Paint smock
Paper towels
Newspaper

What to do:

Spread newspapers on the table. Place water container on the table.
Tape all four sides of the paper to the board. (The paper will wrinkle when painted, but will flatten back out when dry.) Place the board on the easle, which should be set at eye-level when the child is standing.

Scoop the primary paint colors (red, yellow, and blue) onto the child's palette, and briefly explain how to create new colors by mixing them together using the plastic knife or a brush. Also show the child how to clean the paint brush between colors and dab off excess water on a folded paper towel. Provide any additional colors that the child requests, such as purple, orange, or green.

Now, just let your child paint!

The painting will likely start out timidly with small, distinct areas of color here and there. Then, as the child become more adventurous, colors will begin to fill the paper in great strokes and swirls. This is often accompanied by verbal cues, such as "Here's some green!" or "Whoa, look at all this pink!." Eventually, most of the colors will likely be blended together to make a nice army green.

Most of your youngster's first works will consist of random strokes of color that represent the playful experience of painting, such as in these pieces by two 4-year-olds, Billy and McKenzie. Then at a certain point (only the child knows exactly when), the painting will be "done." If the child wants to try another, carefully remove the completed work from the board and set it aside to dry. Wipe the board down, and tape on another piece of paper. This time your child may do exactly the same type of thing, or he may attempt to paint apply color in a specific design or even a representational piece.

Below, 4-year-old Erik's first painting (left) was obviously an experiment in playful design and color-mixing. The second painting (center) was a bit more deliberate in design and color selection. Erik's final painting illustrates planning in both the use of color and subject representation. In fact, he entitled this piece "Beehive in a Tree."


Isn't it amazing what young children can do when given encouragement and the proper materials?