Friday, August 23, 2019

More Awesome Abstract Art!

Heroic Roses,  1938


"A drawing is simply a line going for a walk."            
                             ~ Paul Klee

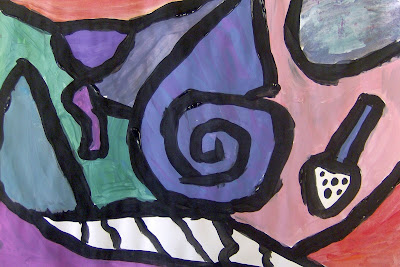
For our last art project of the summer, we painted like Paul Klee! 

This 20th century Swiss-German artist was an Abstract-Expressionist. Much of his work is comprised of bold black lines, striking forms, and vivid color. 


Just our style!!!


First we painted bold black lines to create interesting shapes and forms. We filled maybe two of them in with additional patterns.


After the paint dried, we filled in each section with color. We mixed our own tints and tones for most of the colors. (We used liquid tempera paint.)


Many of our artists mixed their own brand new colors and named them!

A few went back over their black lines after the colors were added and others didn't.


These paintings are so exciting and bold!  I just love the freedom of expression that I witness whenever we create abstract art. Plus, it's just plain FUN!!!

These artists ages ranged in age from six to twelve. 


Our thanks the the Imagination Tree for this awesome abstract art project idea.

Saturday, August 17, 2019

Grizzly Bears!


This past week we created these Grizzly Bears. We learned the difference between grizzlies and other types of bears, and we learned that grizzlies are at the top of the food chain in the forests where they live and an important part of the overall ecosystem. We also learned that they were once endangered and could become endangered again.


First we painted paper lots of different shades of brown. You can see our little grizzly bear helper checking out our young artists' work.


Next we painted our the sky for our backgrounds.


Then we painted the forest right over the sky.


Next, we cut out and assembled our bears. These bears are BIG, which can be a challenge for some young artists when drawing the shapes (on the back) and cutting them out. Kids often make things way too small.


The pieces of the bear were assembled and glued down. Then we used oil pastels to add facial details and glued the bear to our backgrounds.


My sample


Check out That Artist Woman for details about how to create this fun, 
mixed-media project!

Friday, August 09, 2019

3-D Abstract Art!


We created abstract art in    3-D while recycling cardboard at the same time!

This project was really fun and we loved the results.


We started with a piece of cardboard, maybe 8" x 8." we cut and glued long and short strips of more cardboard to it with ordinary white glue. Then we glued more on top of those. 


Lastly, we painted the whole thing with acrylic paint. 

Cool, huh?


We also made 3-D scribble art! Just draw a big scribble on an ordinary sheet of paper and color in the sections using solid colors, patterns, or both. Then cut out the entire shape and cut into the shape somewhat on your lines. Finally, twist and turn it until you can seat it on a 4" x 4" piece of construction paper and staple it down. 

Viola! An awesome paper sculpture.

More Abstract Art!


The artist is essentially a channel."                    ~ Piet Mondriaan
           
We made abstract art like Piet Mondriaan, collage-style.
 
Mondriaan's style of abstract art is fun to create using cut pieces of colored paper. We glued the paper squares and rectangles to our substrate (white 12" x 18" sulphite paper).


We then glued black strips of paper between each color. We also added some surprises here and there. See of you can find them!

We also created another kind of collage-style abstract art using painted paper cut in similar shapes for unity. 
Kieleigh's Triangle Collage.

Shea's Circle Collage

Metallic Abstract Art - My Sample 

Joseph's Metallic Abstract

Monday, August 05, 2019

Unicorns of the Sea!


Narwhals, which are also called the Unicorns of the Seaare incredibly interesting and unusual creatures. They also elusive and rarely seen.


So, in the interest of science, our young artists have worked hard to create these fabulous illustrations of the Narwhal, just for you! 


They started by sketching a few of them on our individual white boards. One they had a plan, we sketched them again on a 12 x 18" piece of watercolor paper. 


Then we outlined them again and drew in the details with black Sharpies.


Next, we filled our Narwhals in with colors and patterns using oil pastels. It was not our goal  to color them in completely. That would be done in the next step.


They used one color of liquid watercolor to fill in our Narwhals, creating a resist; the paint filled only the areas in between the oil pasteled areas.


The next step was to paint the water. They drew white pastel swirls and bubbles in the water, then we covered the watery areas with liquid blue, aquas, and violets. Again, the resist effect made the bubbles and sparkles pop out!


The last step was to spritz the water a bit and add some course salt to the wet areas to work its magic. After they dried, we wiped off the salt. 

Beautiful!