Saturday, May 28, 2022

Woodland Animals


This week we painted our favorite North American critters in their beautiful woodland homes.


We have painted these watercolor birch tree scenes in the past, but this painting was much more complex because it is larger and involves freehand drawing, mixed media, and various watercolor masking techniques. 


The animal was first selected and sketched (using a photo resource) with graphite pencil. We then used masking tape to create our birch and/or aspen trees (like painting with tape!) while ensuring that at least a portion of the animal is hidden behind a tree. Then we completed the visible portion of the animal with colored pencil and/or crayon. 


Before painting, we also used Q-tips to add masking fluid, which would later become wildflowers. 

We then loosely filled in the watercolor scene, dabbing colorful paint right over the masked off areas. The animals resisted the watercolor, but we were still able to paint over them as well with watercolor that matched the animal's fur. This filled in any white areas while leaving the furry textures visible. 


I think the best part is removing the masking material from the dried painting to reveal sections of clean white paper.  This invites the artist to add birch tree shadows and markings to create shape and volume, as well as the colorful wildflowers. Further details are then added such as branches, grasses, and foliage into the upper trees.  

This 11" x 15" painting project takes about three hours to complete. 

The first three paintings were created by young artists ages 8-12.  The bottom three paintings are adult samples. 

Saturday, May 21, 2022

Awesome Cardboard Construction!

It's true. We art teachers love cardboard. We collect it. We divide it by size and into piles of useful, great, and amazing cardboard. Thin and bendable, corrugated, double corrugated, thick like wood; we love it all. It's like gold to us. What can we do with cardboard? What can't we do with cardboard? 

We stock up on cardboard tubes of all sizes. We love cardboard egg cartons and oddly shaped fruit packing cardboard. All the better to make stuff with!


Such as this 3-dimensional relief sculpture of an awesome dragon. 


It was first constructed from cardboard, carboard tubes, tissue, masking tape, and other recycled or found objects. Then the background was covered with tissue paper and the dragon was painted.


This cardboard dragon sculpture was constructed during a two-day cardboard assemblage, construction, sculptural workshop. This type of 3D art-making is very appealing to young artists!


To make a free-standing 3-dimensional dragon, this artist first drew a picture of the dragon idea on paper. Then she drew the dragon's main body on extra thick corrugated cardboard and the other parts thinner cardboard, including wings, to be cut out and assembled.  


The parts of the dragon were then glued together and the webbing was added to the wings. (We recycled a plastic birthday party table covering for that because it was thin - but stronger than tissue paper.) Then the entire dragon was painted. 


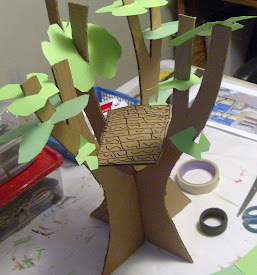
This project was a bit different. The artist wanted to build a treehouse, tree and all. So she started with a simple, free-standing tree, complete with branches full of leaves. Then she added the basic tree house platform - made of solid wood, as you can see (smile).


Now she was able to add the roof, the ladder, a tire swing, and a water slide, complete with a pool full of water toys!


Our inspiration for this workshop* was British artist and teacher Darrell Wakelam's "three-dimensional sculptural work using simple techniques and cheap, everyday materials, mainly scrap cardboard and paper." 

other than the piles of cardboard kept on hand by me, as previously disclosed above.


Just to be sure, I decided to use Darrell's techniques to create my own cardboard relief sculpture prior to offering this workshop, of course. Strictly research. 

I made this zebra, and it was fun! 
For oodles of ideas and resources relating to using cardboard and other recyclables for making three-dimensional assemblages and sculptures, you can visit Darrell's website at darrellwakelam.com.

Saturday, May 14, 2022

A Floral Bouquet


I just LOVE these little floral bouquets! 

So colorful, simple, and cheerful!

These little still life paintings are created in the style of 19th century French Impressionist Berthe Morisot.  


They are painted on 11" x 11" colored sulfite (construction) paper and mounted on 12" x 12" black poster board for a nice contrasting border. 

I try to include this painting project every now and again because it is so much fun to paint and the results are always so stunning!


Take a look at our previous post for more details about how to paint these cuties. 

Our thanks to Painted Paper Art for this great painting project idea!

These paintings were created by artists ages 8 through 12.


* Addendum *

We painted these floral bouquets for Mother's Day 2023. 


Lots of brilliant color!


Delicate flowers with beautiful pinks and reds!


Another sample by me. (Of course I made another one - I can't resist.)