Saturday, February 25, 2023

Aurora Borealis


If you have a bucket list, seeing the Aurora Borealis might very well be on it. 

Unlike many other bucket list items, the northern lights are known to be challenging to photograph. You need to be at the right place, at the right time of year, at the right time of day, on a good day, and have skills and knowledge about night sky photography. And you need luck

Another option is to paint the Aurora Borealis. We artists think like that. 

Here's a polar bear that lives under the northern lights! 

These auroras were created with soft pastels. The sky was then splattered, and tempera snow and trees were added. The bear was drawn (pencil, pastels, ink), cut out, and glued into the snowy scene.


This lively northern lights show is reflected in a frozen river.

The artwork was created in tempera paint on black 12" x 18" sulfite paper. 


These colorful auroras look like ribbons of light! This is an acrylic painting on a 12" x 16" canvas panel. The artist is 11 years old. 


The painting at the top of this post is also acrylics on canvas, 16" x 20" in size. Shadows and highlights created by the brightly lit sky are nicely depicted, as well as colorful reflections in the frozen river. This painting was created by a teen artist, age 13. 

Here is another polar bear wandering the arctic circle in the light of the Aurora Borealis! This is a mixed media painting of soft pastels, ink, and tempera paint.

Did you know that February 27 is International Polar Bear Day?

These Northern Lights are painted over a large body of water. Wow!
(The artist is age 14.)

Thursday, February 23, 2023

DIY Cat Toys

One of our young artists suggested we make cat toys. 

So I did a little research and came up with some kitty toy ideas we could make using recycled materials and studio supplies that we have on hand.


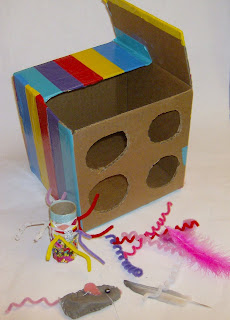
We made feather wands, jingly balls, catnip toys, crazy springs, a reversible hide-&-seek box, a bouncy pom, and pipe cleaner toys that resemble bugs or who-knows-what!

The kids had a blast designing and building these cat toys. I gave them a few basic ideas, then they took off with their own amazing cat toy ideas!


There once was a cat named The Cat

Who got a bit lazy and fat.

So we made some fun toys

That smelled good and make noise,

And The Cat was quite happy  

with that!

If you want to make some cat toys for your kitty, here is a list of the supplies we used to make ours:

Recyclables: cardboard tubes, twine, chop sticks, and cardboard scraps/boxes.

Studio supplies: felt scraps, pipe cleaners, duct tape, washi tape, feathers, bells, and yarn. 

(We also used beads, but be careful to string and attach them securely so your cat won't swallow them.)


Tools: scissors, adult assistant with a craft knife or box cutter, darning needle and embroidery floss, hot glue (to secure feathers together), pencils and pens (to wrap pipe cleaners around to make crazy springs), and so forth. 

Don't forget catnip! Sprinkle a bit inside felt shapes that are sewn together. Also try taping some inside your cardboard tube toys!

This reversible hide-and-seek box can be used two ways: 

You can hide various fun objects (feathers, jingle balls) and interesting (catnip) toys in it for the cat to find through the holes.

You can turn the box upside down (holes down) leaving a side flap opening. Now your cat has a hiding box!

Have fun making your own cat toys!

Sunday, February 05, 2023

Snowman Art!


At this time of year we just can't resist making Snowman Art!

Ours was not the usual snowman art, however. We put a fun little spin on our all of snowmen!


For example, meet Snowman Scoops!

(Can you guess where he got his name?) 

This is tempera paint on colored sulfite paper.  We worked on depicting volume by adding shadows and highlights. Then we used markers to add the details. 


We also made these adorable paper Snow Globes! 

Again, we used shadows to create volume, this time with oil pastels.


We also made stands with fancy gold name plates for our Snow Globes. The above snowman's name is Twinkle Nose.

This is Jolly.


Have you ever wondered what a snowman would look like if you were lying beneath it (while making a snow angel)?

Probably like this.

We painted our backgrounds in wet-on-wet watercolor, and completed the details with oil pastel - all while learning a bit about perspective. 


Here we have a more traditional snowman painting, only with a spin on it as well. This snowman was painted on wood!

The teen artist created this decorative winter artwork with acrylic paint on a weathered wooden plank (from an old fence).

Do you see the little bluebird?