Friday, August 10, 2018

Winged Wonders!


We created a variety of flying insects during  "Winged Wonders" week. 


First, we learned about Insect Symmetry to understand and create insect anatomy.


We folded our paper down the middle and, using an black oil pastel, we drew one half of the head (and eyes and antennae) along the fold at the top. Then we drew one half of the thorax below the head and one half of the abdomen. We added three legs and a few interior patterns, then we folded the paper in half again with the drawing to the inside. 


We rubbed the folded paper all over allowing the pressure and heat of our hands to transfer some of the oil pastel drawing to the other half. Then we opened in and went over the lines one more time with the oil pastel. Then we painted our symmetrical insect and the background with tempera paint, and added a few acrylic glitter paint dots with the tip of a paintbrush handle. 


Next, we created these amazing dragonflies! 


The basic shape was first sketched with pencil to ensure proper placement on the page. Then it was redrawn with a fine point (or ultra-fine point) black Sharpie, and texture was added to the head, thorax, and abdomen.


Now it was time for the artist to add creative forms and patterns to the wings. They could be simple checkerboard patterns, wavy lines, zigzags, or Zentangles. Or, they could be complex realistic patterns like those found in dragonfly photo images.


Here is the completed inked dragonfly. 

Lastly, we added watercolor. We used wet-on-wet for most of the painting, remembering that Sharpies will not run or smudge. We also added a little salt for texture (and because we like it.)

As an option, a bit of iridescent paint can be added to the eyes, wings, or body. Or the whole dragonfly!

Dragonfly, watercolor and ink, by Abbigail A.

Tuesday, August 07, 2018

A Tropical Island Sunset

This week we painted a tropical beach scene at sunset. 


We used soft pastels to cover the paper from top to center (the horizon line) with sunset colors and then reflective colors to the bottom of the paper. We learned that laying in the color works best with the pastels lying flat instead of using the tips.


Next, we poured white tempera paint into a bowl, dipped a finger into the paint, and smeared it back and forth over the soft pastels to blend the colors and create a lovely sunset-lit sky and its reflection in the water. 


After the paint dried, we sketched in a simple tropical scene with vine charcoal - just the landscape shapes in the background and the tree shapes. (Our braver artists skipped the preliminary sketch.) Then we filled in the shapes with thick black tempera paint, adding the palm tree fronds and a flock of birds with slightly thinned tempera.


Here are a few more that we did in an earlier summer art camp:

My sample

This is an expanded version of an Art for Kids: Ocean Scenes painting idea, in which black cutouts are used for the silhouettes (probably an easier option for younger children).

Sunday, August 05, 2018

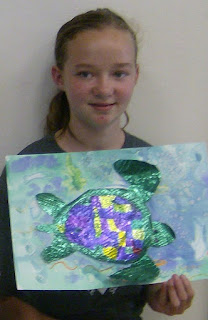
Shimmering Sea Turtles


We ended our summer themed camp of Seashores and Oceans with these shimmering Sea Turtles!


The watery background was created with crayons and painted first with clean water, then with watercolor, called a wet-on-wet technique. While the paint was wet, we added a little salt for a more watery look. 


While the paint dried, we created our sea turtles. We traced the shell on a piece of heavy duty foil using an embossing tool (like a leadless pencil) and added the interior shapes. The we placed a texture plate beneath each shape and colored over it with a Sharpie to create a new texture and a color for that area. 


After completing the shell, we embossed the shapes of the fins, head, and tail. Again, we colored them over texture plates. 


Then we cut everything out and glued our shimmering sea turtles into their watery background.


Next time I plan to have a greater variety of Sharpie colors on hand for even more colorful shimmering sea turtles!

Saturday, August 04, 2018

Tide Pools & Fish Schools


What is a Tide Pool?  It's sort of like a sea puddle that's left behind when the tide recedes from high to low tide; and this little pool might have all sorts of sea life living in it! 


We made these tide pools using crayons and thinned blue watercolor for a resist effect. Then we brushed white glue around the outside of our pools and sprinkled it with sand. After it dried we shook off the excess sand and hot glued on a few little sea shells.

We also made watercolor batik paintings of beautiful fish!


We used a variety of fish templates for this project because in a school of fish, all of the fish would look alike. The artists also chose a fish to be an "oddball" or an outsider to hide within the school of fish, and they drew it first. 


They added the rest of the fish by tracing another fish template over and over again. The trick here was to determine how to overlap the fish. Some are in front of, and some are behind the other fish. 


Next, we painted over all of our pencil lines with masking fluid. This keeps the paint off of the paper, even if you paint right on top of it. It also helps keep colors separated from one another and it makes great bubbles!

We painted our fish and the watery background. Then, after the paint was dry, we rubbed off the masking fluid, and erased any remaining pencil lines. Beautiful!


This art still has pencil lines to be erased. It pays to draw lightly!

Take a Walk on the Beach

Continuing with our seashores and oceans theme, we created Beach Art!

This one, entitled "A Walk on the Beach," was rendered with oil pastel on blue construction paper. 

We used this photo as a visual resource for this artwork.


I can almost hear the crashing waves! Can you?

Friday, August 03, 2018

Sea Wanderers


Wanderers of the Sea

Graceful and so elegant
These Wanderers of the Sea
So calm, these gentle giants
As they sing their songs to me.
They wander through the oceans
Though mammals they may be.
They live and sleep among the fish
These Wanderers of the Sea.


We created our own Sea Wanderers with tempera paint on heavy paper, 22" x 22." 

We added collage graphics and details once the paint was dry. 


This was a great lesson in mixing and using monochromatic shades and tints to create values to depict depth and volume. 


We started with dark to light blues in the whale, then used a mixed shade of blue, green, or turquoise to create the sea, again using mixed tints and shades.


It was okay to work from dark to light, then start from dark to light again, like layers of ocean waves in the distance.


Next, the sky was painted. Then other sea creatures and details were drawn, cut out, and glued into the ocean scene. 


Our whales also spouted a plume of water from their blowholes, to which some artists added shimmering glitter paint!


Each artist was also given a copy of the poem, Wanderers of the Sea, shown at the top of this page. Some chose to attach it as an element of their artwork. I love to help young artists make connections between the visual and language arts, especially poetry.


Our thanks to Studio "Change" in Omsk for this amazing art project idea!

Sea Creatures!


Our Budding Artists made SEA CREATURES! Actually, they made entire FAMILIES of sea creatures! 

We made seahorses and we made octopuses. Our projects involved lots of fun crafty materials and processes that help young artists build skills while being creative and making something they can take home and play with!


First we read Eric Carle's Mr. Seahorse and learned that daddy seahorses take very good care of their children.


Then we made our own seahorses. We painted folded paper plates with watery white glue and stuck on colorful tissue to make the seahorse body. We added heads and tails and fins with a stapler and we glued on an eye. 

Then our artists made child seahorses with folded cupcake papers and markers (this was their own original idea).


Next we made octopuses using strips of construction paper. It was fun adding the tentacles with paint dotting tools (bingo daubers). We also learned to curl the octopus legs (arms?) around a pencil or marker. 


How do you make a girl octopus? 

Long eyelashes and a bow. Of course.

Thursday, August 02, 2018

Sand Castles


How can you build SAND CASTLES when you are not at the BEACH?

Easy! These little artists built these fabulous sand castles right here in the art studio, and yours can too.

All you need is sandpaper! 

You'll also need a large piece of white drawing paper, tempera paint (blue, green, and white), scraps of construction paper, a few tiny seashells, glue stick, white glue, and scissors. 

We also used crayons, a butterfly punch, and scraps of patterned paper for a few added details.


It also helps to have a photo or two of sandcastles to look at. 


Start by painting the ocean using any combination of green, white, and blue. This artist mixed all three together to create a lovely turquoise sea. They can leave the bottom of the paper unpainted because it will be covered with a sandpaper beach. 


Next, have them tear one or two wide strips of sandpaper and glue it to the bottom of the painting. 

While the paint dries, cut a few basic shapes out of sandpaper and show them how to lay it out to form towers and other structures you might find in a sand castle. These artists loved cutting sandpaper - and tearing it too! 


They arranged their pieces on the beach until they were satisfied, then they glued them down.

Now it's time for the details! One thing we found is that it's really fun to draw on sandpaper with crayons! 

Out artists added windows and doors. Then they added beach balls, butterflies, sand buckets, and sea creatures. We also glued on tiny seashells with hot glue, but white glue works too.


This artist added an entire family to her beach, but then had second thoughts. She finally decided the beach was too crowded, so she removed the children and left the parents resting on the beach while the children went swimming!

Artistic license allows you do these things, you know.