Saturday, February 25, 2023

Aurora Borealis


If you have a bucket list, seeing the Aurora Borealis might very well be on it. 

Unlike many other bucket list items, the northern lights are known to be challenging to photograph. You need to be at the right place, at the right time of year, at the right time of day, on a good day, and have skills and knowledge about night sky photography. And you need luck

Another option is to paint the Aurora Borealis. We artists think like that. 

Here's a polar bear that lives under the northern lights! 

These auroras were created with soft pastels. The sky was then splattered, and tempera snow and trees were added. The bear was drawn (pencil, pastels, ink), cut out, and glued into the snowy scene.


This lively northern lights show is reflected in a frozen river.

The artwork was created in tempera paint on black 12" x 18" sulfite paper. 


These colorful auroras look like ribbons of light! This is an acrylic painting on a 12" x 16" canvas panel. The artist is 11 years old. 


The painting at the top of this post is also acrylics on canvas, 16" x 20" in size. Shadows and highlights created by the brightly lit sky are nicely depicted, as well as colorful reflections in the frozen river. This painting was created by a teen artist, age 13. 

Here is another polar bear wandering the arctic circle in the light of the Aurora Borealis! This is a mixed media painting of soft pastels, ink, and tempera paint.

Did you know that February 27 is International Polar Bear Day?

These Northern Lights are painted over a large body of water. Wow!
(The artist is age 14.)

Thursday, February 23, 2023

DIY Cat Toys

One of our young artists suggested we make cat toys. 

So I did a little research and came up with some kitty toy ideas we could make using recycled materials and studio supplies that we have on hand.


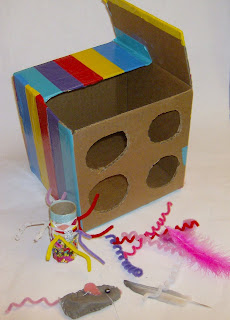
We made feather wands, jingly balls, catnip toys, crazy springs, a reversible hide-&-seek box, a bouncy pom, and pipe cleaner toys that resemble bugs or who-knows-what!

The kids had a blast designing and building these cat toys. I gave them a few basic ideas, then they took off with their own amazing cat toy ideas!


There once was a cat named The Cat

Who got a bit lazy and fat.

So we made some fun toys

That smelled good and make noise,

And The Cat was quite happy  

with that!

If you want to make some cat toys for your kitty, here is a list of the supplies we used to make ours:

Recyclables: cardboard tubes, twine, chop sticks, and cardboard scraps/boxes.

Studio supplies: felt scraps, pipe cleaners, duct tape, washi tape, feathers, bells, and yarn. 

(We also used beads, but be careful to string and attach them securely so your cat won't swallow them.)


Tools: scissors, adult assistant with a craft knife or box cutter, darning needle and embroidery floss, hot glue (to secure feathers together), pencils and pens (to wrap pipe cleaners around to make crazy springs), and so forth. 

Don't forget catnip! Sprinkle a bit inside felt shapes that are sewn together. Also try taping some inside your cardboard tube toys!

This reversible hide-and-seek box can be used two ways: 

You can hide various fun objects (feathers, jingle balls) and interesting (catnip) toys in it for the cat to find through the holes.

You can turn the box upside down (holes down) leaving a side flap opening. Now your cat has a hiding box!

Have fun making your own cat toys!

Sunday, February 05, 2023

Snowman Art!


At this time of year we just can't resist making Snowman Art!

Ours was not the usual snowman art, however. We put a fun little spin on our all of snowmen!


For example, meet Snowman Scoops!

(Can you guess where he got his name?) 

This is tempera paint on colored sulfite paper.  We worked on depicting volume by adding shadows and highlights. Then we used markers to add the details. 


We also made these adorable paper Snow Globes! 

Again, we used shadows to create volume, this time with oil pastels.


We also made stands with fancy gold name plates for our Snow Globes. The above snowman's name is Twinkle Nose.

This is Jolly.


Have you ever wondered what a snowman would look like if you were lying beneath it (while making a snow angel)?

Probably like this.

We painted our backgrounds in wet-on-wet watercolor, and completed the details with oil pastel - all while learning a bit about perspective. 


Here we have a more traditional snowman painting, only with a spin on it as well. This snowman was painted on wood!

The teen artist created this decorative winter artwork with acrylic paint on a weathered wooden plank (from an old fence).

Do you see the little bluebird?


Friday, January 27, 2023

Squirrel Appreciation Day


Fact: Squirrels are among the cutest creatures in existence. 

(Ask any child. They'll tell you.)

And did you know that January 21 is Squirrel Appreciation Day?

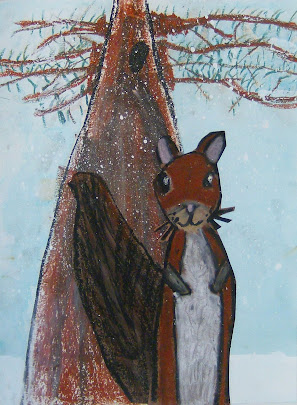
So, of course, we had no choice but to create these Little Squirrel  Portraits in celebration of our cute little squirrel friends.


We started by creating a background that shows the squirrel's tree home - from his point of view at the base of the tree. This was a great way to learn about perspective!

We also had to decide what kind of tree our squirrel lives in - is it an evergreen or a deciduous tree? The tree was drawn and completed with oil pastel.


Next, we needed to decide the season so that we could complete the sky and the background. Would we use warm summer colors or golden fall colors, or would the background be wintery and cold? The chosen colors were painted over the entire background with liquid watercolor.  If a snowy background was chosen, we also splattered it with thinned white tempera paint using a toothbrush.


We drew our little squirrel on a 1/2 sheet of brown construction paper (or sulfite paper).  The furry details and a cute little squirrel face were added with oil pastels, and the squirrel was cut out.

The tail was drawn on another 1/2 sheet of brown paper and lots of fur was added. It was cut out as well.


Then the squirrel was glued into the scene right over the tree, tail first. Note: As a fun option, you can glue a piece of foam (packing material?) between the squirrel's head and the background for 3D look!

"Tree Squirrel," by a teen artist
Acrylics on Canvas

These talented wildlife artists ranged in age from 6 to 13 years.

Saturday, January 14, 2023

Winter Landscapes

These lovely winter landscapes are created in the style of of contemporary artist and illustrator Jen Aranyi. 


We love the crisp clean lines that so aptly depict these icy landscapes.  


The simple wet on wet watercolor in the sky adds just enough color to these majestic little works of art.

This artist worked out a few winter landscape ideas in her sketch journal before proceeding with her final artwork. 


Here is a full sketchbook page illustrating the usefulness of the sketchbook to develop and work out ideas before moving on to the final artwork. 

As an option, the artist could finish this sketchbook artwork in the future.

Hatching is used to add shadows when using ink, to depict volume and three dimensionality. Also, perspective is attained by varying the tree sizes to indicate distance, the midground, and the foreground. The trees are completely filled in to create a stark contrast with their icy surroundings.


This is a practice sketchbook scene created by one or our younger students. She is learning to work with ink to create hatching for shadows in the mountains and also learning to incorporate perspective into her drawing. 


Here is her final artwork.  

We mounted our geometrically shaped artwork on black sulfite paper to create a nice black border. 
NOTE: We have created artwork in Jen Aranyi's style before. Check out our previous weblog post, Jen Aranyi-Themed Painting to see more. 

Here's another little wintery scene, by a teen artist.  
Watercolor and Tempera on Paper

Saturday, December 17, 2022

Wintering Birds


If you are a bird watcher (like I am) you know that many birds do not "fly south" for the winter.

They spend their winters in - and thrive in - cold, snowy climates. 


Black-capped Chickadee, painted collage


Last Thursday, I spent a good part of my day observing birds in my own Idaho backyard. There are about three inches of snow on the ground and the temps were about 20°F.


I saw: several flocks of starlings, a house wren, a scrub jay, two magpies, a northern red-shafted flicker (a type of woodpecker), and a robin!


Blue Jay, watercolor and acrylic on paper


Our goal as artists was to illustrate backyard birds that winter in cold climates such as ours in southeastern Idaho. Our artists used mixed media for their illustrations, including tempera paint, oil pastels, collage, watercolor, and acrylics. 
Blue Jay with Northern Cardinal, oil pastel and tempera collage

You can learn more about how to create this wintering bird mixed media collage on our original weblog post, Backyard Birds

Saturday, December 10, 2022

Christmas Ornaments Galore!


We've just made Christmas ornaments galore! 

Using patchwork, felt, wood, paint, buttons, and more!


Here's a striped Christmas blockhead! 

And cute scratch art stars!

There're Grinches down chimneys, to steal what's not theirs!


Here's Santa's log cabin,
and a penguin snow globe! 

We've got painted wood critters, and a snowflake that glows!


A small painting easel, and snowman art too!

More snowflakes, a tree, and a gift just for you!


We have buttoned up snowmen!

And Santa is here!

And a wood cookie Rudolf, to bring you good cheer!


Yep, you can make Christmas ornaments from whatever you have on hand. Tip: a hot glue gun is very helpful. Merry Christmas!!!

Saturday, December 03, 2022

Folk Art Santa

This week we celebrated Santa through the ages and as he appears in other
countries.


Also known as St. Nick, Kris Kringle, and Father Christmas, he brought toys and goodies to children on Christmas Eve just like our present day Santa. 

However, early images of Santa looked quite different than the Santa we know today. He wore long coats of various colors and ornamentation. 

He often carried Christmas trees and things like food and toys in baskets. He sometimes had large pockets, belts, and ornate shoulder bags. 

The children were very interested in these nostalgic images of Santa Claus and wanted to create their own. 

We originally created this type of Santa artwork in December of 2019. 

You can see more about this project and how we made it, including step-by-step instructions, on our original weblog post: Santa Folk Art.

Thursday, November 17, 2022

Thanksgiving Pop-Ups!

 We made Thanksgiving Pop-Up Turkey cards!
These pop-ups could be given as greeting cards or serve as perfect centerpieces for the big Thanksgiving feast!
          Check out smART Class: Pop Up Turkeys to learn how to            make your own!

Wednesday, November 16, 2022

Magic Potions!

We artists love Halloween! So many spooky fun opportunities for art! 

This year I wanted to try something a little different: why not combine wizards and witches and mad scientists and alchemy and magic potions and moonlit nights and ghosts and spider webs all into one amazingly eerie painting?