Saturday, October 28, 2023

A Very Spooky Forest

It's that SPOOKY time of the year again and as always - we made crazy awesome spooky art!

This little Jack o' Lantern in the middle of a Spooky Forest is one of our favorites - especially with our teen and grownup artists!

These spooky scenes were created in our adult art class.

You can see more Spooky Forest Jack artwork right here.

Thursday, October 26, 2023

More Halloween Inchies!


We've made these Halloween Inchies in the past and they were so much fun -- it was definitely time to try them again! 

Inchies are tiny works of art that follow a theme, such as Christmas, fall, or our favorite of all: 

Halloween! 


Our inchies were created on 4" x 4" square substrates. (Note: squares can be cut smaller if you wish: 3 x 3 or even 2 x 2 inches can work.) Substrate papers can be watercolor paper, drawing paper, construction paper, patterned paper, or whatever will work for the art media to be used and the vision of the artist.

Each square is an individual piece of artwork. It might be a watercolor painting, a collage, an oil pastel drawing, or multimedia artwork. Your art supplies can be whatever you have on hand. Take a look at That Artist Woman for an excellent supply list and more Halloween Inchies artwork ideas, too. 

Beware, making inchies is messy business! You'll likely work on several at once - as one dries, another is started, and then another. Just let it happen and enjoy the process (and the mess)!


Inchies can be displayed on black poster board in a grid-like fashion. It's fun to let the kids figure out how many inchies they will need to make for a 2 x 2, 3 x 3, or 4 x 4 square grid. How many would you need for a 5 x 5 grid? Wow! 

Shown here are 3 x 3 square grids. In the past we have seen 4 x 4 grids as well - I really love these! The more the better.  Here are a few more that we have made during Halloween open studio time (scroll down a bit to see the inchies.)

Wednesday, July 19, 2023

MORE CrAzY ART Camp!


On the second today of CrAzY ART Camp, we made EXPLODING Art Books!

Yup! This innocent, sweet little book is loaded with an Explosion of ART!!!


Also called Squash Books, this is an exciting project that I have done in the past with older kids - but these kiddos really want to make one - so they did!  

Exploding Art books are created in a series of steps, beginning with a large abstract painting. While it dries, the book itself is assembled, which involves binding the covers and some origami-type paper folding. Then the artwork is cut up and glued into the book.
Of course, I made one too, along with my young artists: 

To learn how we made these or to make your own, see our previous weblog posts, EXPLODING Art Books and An ART Explosion!

Tuesday, July 18, 2023

CrAzY ART Camp!

 This week was all about crazy art at CrAzY Art Camp!  

On the first day we made Crazy Glasses. We needed these glasses to help us see all the craziness and because they made us laugh.
If you want to make your own Crazy glasses, you can find instructions and a fun template at Picklebums.com.

Now that we were in the right "frame" of mind, 
our next crazy, loony, wacky task was to make: Croco-gators!
These are obviously not alligators nor crocodiles. 
They are something else. They are croco-gators, of course!

These critters were painted on heavy black poster board - cut in half the long way. The basic shapes were painted directly on the surface with white tempera paint, beginning with the rectangular body.

Then a long skinny triangle was added for a tail, and two long very skinny triangles for the mouth with little triangular teeth. And feet with sharp claws.
We added a few more sections within the body and some patterns too.  Then we mixed several color tints by adding the colors to puddles of white tempera paint.  (White plus a color makes a tint; such as white plus red makes pink - a tint!) We filled in the croco-gator's body with color and more patterns. 
Then, after it dried, we used a big black marker to add a few more details and a little outlining.

Day 1 of Summer CrAzY ART Camp was great fun! 

Saturday, June 24, 2023

World Giraffe Day!


We celebrated World Giraffe Day (June 21st) by creating Giraffe Art in mixed media!

We started by looking at photos of giraffes and observing things that make them so unique - such as their long necks (of course), their spots (which fix together like puzzle pieces), their very long legs, their oddly-shaped little horns, and their long eye lashes! 


We chose a piece of colored sulfite paper (9" x 12") and drew the basic shape of a giraffe, starting with the body first, using white chalk - which is easy to see on colored paper, and easy to wipe off for quick changes. 

Our goal was to keep the giraffe large - to fill up the paper - and to leave room for that very looooong neck!


Then, using oil pastels, artists drew as many or as few details as desired. Some added the spot patterns, for example, and others decided to wait and use paint for that. 

Some also added a few background details.

Next, we painted! (Yes, this is truly a mixed media artwork.)


Using liquid tempera paint, we finished filling in our giraffes and completed a background. Some artists went with natural African savannahs and similar environs, while others decided their giraffes lives in a flower garden or among giant sunflowers!


After the paintings were completed and the paint was dry, artists then added more oil pastel details right on top of the paint. Many also decided to add some outlining so that the giraffe would stand out more in the artwork.


Our giraffe artists ranged from five years old to adult. 

Everyone had a great time learning about giraffes and celebrating these magnificent animals through ART!

Monday, June 19, 2023

Art for Father's Day!

 We made these tiny watercolor paintings for Dad, and we framed them in these 3-D frames embellished with natural elements. 


Our artists actually painted two tiny paintings, then picked one out for Dad and one to keep! 

Question: Which was more fun to create, the painting or the frame? 


Tuesday, June 13, 2023

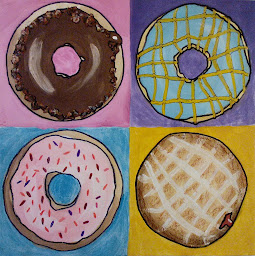
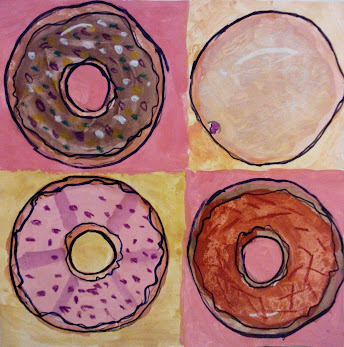
Yummy Donuts!

Artist age 8

Have you ever noticed that, besides yummy morsels of sweetness, donuts are actually delightful little pieces of art?

Fancy or simple, iced or filled, it seems as though each donut is so carefully crafted it seems almost a shame to eat it! 

But yet, who can resist? It's a real conundrum.
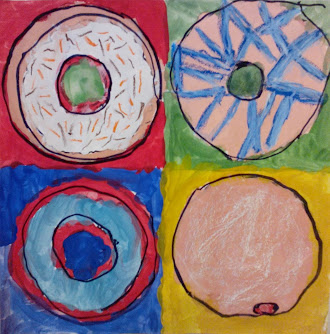
Artist age 5


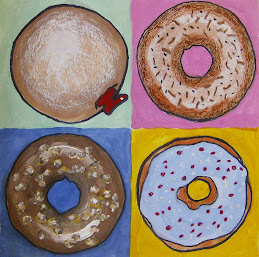
To celebrate National Donut Day (June 2) we created donut art! (We probably would have done it anyway.)


Our young artists had lots of exciting ideas about how to design and decorate their own donuts!
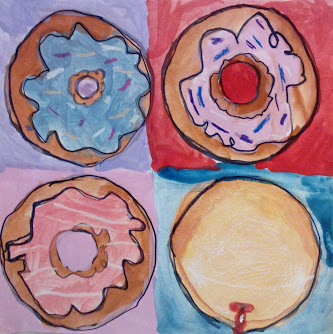

Artist age 6


First our artists divided a 12" by 12" piece of sulfite paper into four squares using a ruler. 

They then traced a cardboard circle template, lightly with a pencil, in each square. A hole was added in the center of each one - unless it was destined to be a jelly filled donut, of course.


Now it was time to plan how each donut would be designed.


Any icing slathered on a donut was outlined, and then all pencil lines were traced with black Sharpies (to be more easily seen while painting).

We used cake temperas, which we mixed with white liquid temperas on a palette for pastel tints. 


Donuts were first painted with soft tans and browns around the
outside and inside edges of the donut shape. The icing colors were added next, using light tints here and there to create a little shine. 


After the paint was dry (cake temperas dry fast!) sprinkles and textures were then added using oil pastels, paint, colored Sharpies, and colored pencils.

A background color was then added to each square, and the donuts were outlined once again for a strong visual effect. Sweeet!!


This artist used watercolor colored pencils to create these beauties:
My demo
My sample


        You can learn more about making your own donut art by visiting our previous post, Delicious Donuts!  

Thursday, June 08, 2023

Beautiful Irises!

Purple Irises, by Jackie (adult)
tempera paint/oil pastel on watercolor paper
This week we examined the works of Dutch painter Vincent van Gogh, who is considered one of the greatest Post-Impressionist artists.

Did you know? Van Gogh only took up painting during the last ten years of his life, and many of his most famous works were painted during the two years prior to his death. He sold only one painting during his lifetime! After his death, his works became incredibly popular, selling for astronomical sums at auctions.

Scarlet Irises, artist age 9
tempera paint/crayon on watercolor paper

Van Gogh's life was a series of ups and downs, but one thing that made him happy (besides painting) were the beautiful iris gardens at Saint Paul-de-Mausole in France. So, he explored this subject often and painted a series of irises - both in the garden and in vases. 

Irises make us happy too, so we decided to paint our own versions of van Gogh's Irises.


Blue and Purple Irises, artist age 11
tempera paint/oil pastel on watercolor paper

One thing we noticed about van Gogh's irises, (and most of his other paintings) was that his brush strokes were very interesting and expressive. They seemed to talk to us or to express what he was feeling as he was painting. Indeed, van Gogh was a predecessor of the Expressionism movement in modern art. 
Blue Irises, artist age 8
tempera paint/oil pastel on watercolor paper


To create our irises, we did not use oil paint and brushes as van Gogh did. Instead, we used tempera paint and - our fingers! That's right, we finger painted. This allowed us to use our fingers just like brushes, and in this way we were able to connect more closely with the painting process and express ourselves through paint strokes made directly to the painting surface.
Soft Blue Irises, artist age 14
tempera paint on watercolor paper

Before we began to paint, we had a quick lesson in drawing irises using this simple guide. We drew them directly on the paper using black crayons or oil pastels. Then we added stems and long, sword-shaped leaves.

I set up our colors in foam egg cartons for easy finger dipping. We also had plenty of white paint to add to bold colors to make pastels and tints like lavender, sky blue, and mint green.
Blue-Violet Irises, by Tasha (adult)
tempera paint/oil pastel on watercolor paper

Finger painting is a lot of fun and a great way to loosen up and form a direct connection with one's artwork.  The fingertips are used to layer or blend and make new colors directly on the paper. You can add highlights and shadows with just a touch of white or a shadowy shade of color. You can create textures by dabbing, swirling, smearing, and mashing paint as needed. 


Painters learn as they go how and where to use bold colors and how to blend colors for more subdued areas, such as the background. They even learn how to fill in the smallest areas using just the tip of a finger. This all becomes part of the creative process. 

To learn more about finger painting at any age, visit Iris Scott's website (love the name), a contemporary artist and fine-art oil finger painter

If you would like to learn more about painting van Gogh's Irises and more student artwork, visit our previous weblog post, Van Gogh's Irises.

Thursday, June 01, 2023

Apples - 4 Ways

Red Apple, mixed media. Artist age 14
 

So... how many ways can an artist portray an apple?

Turns out, lots and lots of ways!

We decided to explore what we could do artistically with an ordinary apple. Our goal was to create apple art using at least four different types of art media. 

This artist utilized charcoal, watercolor, colored pencil, and oil pastels to create her red apples.
One Apple - Five Ways, mixed media. Artist age 11

For more details about this fun lesson, take a look at our 
previous post, One Apple - Four Ways.

Thursday, May 25, 2023

More Dragon Eyes!

Red Dragon Eye
9" x 12" watercolor on paper, artist age 14


Dragons are a popular subject for many of our young artists, so this week we decided to create dragon eyes!

Artists could use any art medium for their dragon eye artwork. 


Our goal was to create an awesomely believable dragon eye surrounded by amazing textures, such as the sharp scales and boney details of the dragon's face above. Shadows and highlights were crucial!


This dragon eye incorporates the violet color of the paper while depicting overlapping and layering of the scales using drawing media such as pastels, charcoal pencil, and Sharpies. 


Green Dragon Eye
9" x 12" pastel, charcoal, ink on paper, artist age 11


The artist decided that the artwork needed something more, so she added some metallic highlights and additional detail within in the eye itself. 

Yellow Dragon Eye
9" x 12" mixed media, artist age 14


This is a mixed media version of a dragon eye, using a beautiful color combination of blues, pinks, and a yellow-green eye!


Flying Dragons
12" x 12" acrylic on canvas, artist age 14

For more about Dragon Eye art, see our previous post: Dragon Eyes!