Saturday, May 21, 2022

Awesome Cardboard Construction!

It's true. We art teachers love cardboard. We collect it. We divide it by size and into piles of useful, great, and amazing cardboard. Thin and bendable, corrugated, double corrugated, thick like wood; we love it all. It's like gold to us. What can we do with cardboard? What can't we do with cardboard? 

We stock up on cardboard tubes of all sizes. We love cardboard egg cartons and oddly shaped fruit packing cardboard. All the better to make stuff with!


Such as this 3-dimensional relief sculpture of an awesome dragon. 


It was first constructed from cardboard, carboard tubes, tissue, masking tape, and other recycled or found objects. Then the background was covered with tissue paper and the dragon was painted.


This cardboard dragon sculpture was constructed during a two-day cardboard assemblage, construction, sculptural workshop. This type of 3D art-making is very appealing to young artists!


To make a free-standing 3-dimensional dragon, this artist first drew a picture of the dragon idea on paper. Then she drew the dragon's main body on extra thick corrugated cardboard and the other parts thinner cardboard, including wings, to be cut out and assembled.  


The parts of the dragon were then glued together and the webbing was added to the wings. (We recycled a plastic birthday party table covering for that because it was thin - but stronger than tissue paper.) Then the entire dragon was painted. 


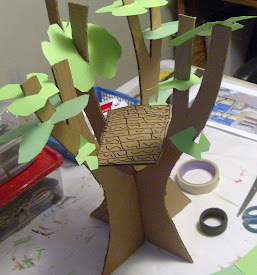
This project was a bit different. The artist wanted to build a treehouse, tree and all. So she started with a simple, free-standing tree, complete with branches full of leaves. Then she added the basic tree house platform - made of solid wood, as you can see (smile).


Now she was able to add the roof, the ladder, a tire swing, and a water slide, complete with a pool full of water toys!


Our inspiration for this workshop* was British artist and teacher Darrell Wakelam's "three-dimensional sculptural work using simple techniques and cheap, everyday materials, mainly scrap cardboard and paper." 

other than the piles of cardboard kept on hand by me, as previously disclosed above.


Just to be sure, I decided to use Darrell's techniques to create my own cardboard relief sculpture prior to offering this workshop, of course. Strictly research. 

I made this zebra, and it was fun! 
For oodles of ideas and resources relating to using cardboard and other recyclables for making three-dimensional assemblages and sculptures, you can visit Darrell's website at darrellwakelam.com.

Saturday, May 14, 2022

A Floral Bouquet


I just LOVE these little floral bouquets! 

So colorful, simple, and cheerful!

These little still life paintings are created in the style of 19th century French Impressionist Berthe Morisot.  


They are painted on 11" x 11" colored sulfite (construction) paper and mounted on 12" x 12" black poster board for a nice contrasting border. 

I try to include this painting project every now and again because it is so much fun to paint and the results are always so stunning!


Take a look at our previous post for more details about how to paint these cuties. 

Our thanks to Painted Paper Art for this great painting project idea!

These paintings were created by artists ages 8 through 12.


* Addendum *

We painted these floral bouquets for Mother's Day 2023. 


Lots of brilliant color!


Delicate flowers with beautiful pinks and reds!


Another sample by me. (Of course I made another one - I can't resist.)

Saturday, April 30, 2022

Critters in Oil Pastel!

Every once in a while we've just gotta break out those oil pastels!

This medium is just so exciting and the results are so satisfying, I try to regularly work them into our schedule, especially for newer students. Even absolute beginners can be successful!


This particular animal art project is one I've done several times over the years. We sketch the image of a bird or an animal on a 9" x 12" sheet of black (sulphite) construction paper, and then we fill in the colors and textures with layered oil pastels. 


We don't focus too much on drawing skills - this project is more about learning to work with oil pastels to blend colors to create shades and highlights, and adding texture such as fur, feathers, softness, roughness, etc. to the image. 


To remove the stress of drawing a 'perfect' image, we transfer the image that we've chosen directly from a photographic resource (usually a calendar picture) to the paper using tracing paper and carbon paper. (Click here to find out how we do this.) This really does allow the student to move on from the drawing phase and get the business at hand - learning to paint with oil pastels. 

Once the basic outline of the model has been transferred the paper, the fun begins! The resource photo is placed on an easel for easy reference, and oil pastels are held up and 'matched' to the colors in the model. These chosen pastel sticks are then set aside as the color 'palette' that will be used for the painting. 


The artist then begins filling in the figure with color - and determining along the way whether to press firmly or lightly, use long lines or short lines or dots of color, and how to layer colors to create shadows, or layer white to create highlights, or create textures atop colors.  


We also learn how to use a sgraffito technique to scratch or carve textures (such as fur) into heavily applied oil pastel. 

In this post is shown an always-favorite subject for oil pastel critter paintings: owls. In the past, our homeschool art club in particular has enjoyed creating oil pastel owls around Halloween time.


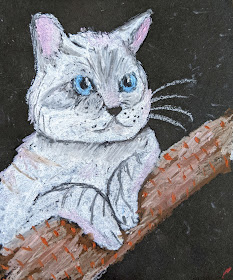
Here are some 'kitty' portraits. 


I've have found that art students of any age (even adults!) can find success and great satisfaction painting birds and animals in oil pastels. 

All of the paintings shown in this post were created by young artists ages 8 through 12, all of whom were trying oil pastels for the very first time!

Thursday, April 21, 2022

Rabbits and Wildflowers

To celebrate Spring, we painted these wild rabbits! 

Over the years, this wary little rabbit, venturing out into a meadow of yummy treats, has become a favorite painting project! 


Whenever we paint these wild rabbits our young artists particularly enjoy painting the dandelion seed pods floating around while their rabbits are munching on goodies. 

These little fellows were painted with liquid tempera paint on lightweight, rough (not slick) poster board, 16 by 22 inches. 

We used a variety of painting "implements" for the wildflowers, such as round sponges and frayed cardboard tubes. We used round stiff brushes and plastic scrubbers for the dandelion seed pods. After all, an artist is not confined to brushes alone! 

We used Sharpies for the finishing touches, such as a bit of outlining and (of course) whiskers! 

In an earlier weblog post, I included an original poem about our painted dandelion rabbits. My hope was, and is, to inspire young artists to write something creative about their artwork or to select some of their own creative writing to illustrate with a painting or drawing.

Friday, April 08, 2022

An ART Explosion!


This week we made   ART 
Explosion 
  Books! 
 
Also called Squash Books (because they are 'squashed' closed), these little art objects fit in the palm of your hand.


About 4 by 4 inches, the books are tied closed with a cord or ribbon.  When opened, they EXPLODE with bold, exciting ABSTRCT ART!


We started first by creating a large piece of colorful abstract art. First we used black Sharpies to outline a few basic shapes and areas in which to paint our colors. 


Then we worked with both liquid and pan watercolors to add color to our abstract artwork. We also added color to larger areas, filling in the entire painting with color. 


After the paintings dried, we added additional details using metallic Sharpies and glitter pens. We also added splattered paint, just for fun! (Yes, abstract art is not only fun to look at, it's fun to make!!!)
Once the artwork is finished and dry, it's time to cut it up! The artwork is cut into twelve 3-3/4 by 3-3/4 inch squares.


(Since our artwork was created on 12 x 18 inch paper, we ended up with leftover strips that we made into bonus book marks!)


Next, the artist chooses her favorite square to glue to the front (or the top) of the book. 

Then the interior structure of the book is created from three 8 by 8 inch pieces of black paper.  Here's a video showing how the book is folded, constructed, and attached to the covers.


Now four of the abstract art squares are glued to the inside of the book and the rest of the squares are cut diagonally and glued to the remaining triangular shaped spaces. 


The last square can be cut and glued to the back of the book and the artist signs it!


Take at look at our original post, Exploding ART Books, for more great 
                             ART EXPLOSIONS!                          

Tuesday, March 22, 2022

Cherry Blossoms!


These cheery little vases of cherry blossoms remind us that spring is here!

These are tempera paintings on grey paper, painted in the style of early 20th century Russian artist Natalia Goncharova. 

You can learn more about how we did them on our earlier post, Cheery Cherry Blossoms! or you can download detailed instructions (pdf) from Painted Paper Art.

Monday, March 21, 2022

More Dragons!


Fantasy subjects such as, (and especially!) DRAGONS, are a popular art subject among many young artists.


We created these dragons within a border filled with symbols and patterns. 


The dragons were sketched in, painted with watercolor, and outlined with ink. Then details were added using Sharpies, metallic markers, and glitter pens. Finally, a background was painted in with liquid watercolors.
Take a look at our earlier Dragon post to see more spectacular dragon artwork!

Saturday, March 12, 2022

More Animals in Snugly Sweaters!

Wolf in a Snugly Sweater
 

Our last winter art lesson of the year:

Animals in Snugly Sweaters!


So cute, and such a great art lesson, too!

Students learned to observe and sketch wildlife and how to work with ink to create facial details and furry textures.


Then they designed a nice warm winter sweater for their furry woodland friends!

For more details and how-to's, see our original weblog post, Animals in Snugly Sweaters.


Squirrel in a Snugly Sweater
Bear in a Snugly Sweater


Thursday, March 10, 2022

Beautiful Snowy Alpines!

These mixed media Snowy Alpines are so gorgeous! 
        You can see how we made them on our original Alpine Trees         weblog post. For all ages, even younger artists!

Friday, March 04, 2022

We Love Penguins!


Who doesn't love Penguins?


Here's a cute little penguin saying hello!


This penguin is having fun as she hops and dances around in the snow!


This momma penguin watches over the little ones as the snow swirls around her. 


All of these penguins were created on white sulfite paper with charcoal, pastels, and black ink, then cut out and glued to a painted and splattered background.


You can find our original posts about making penguin art here and here.