Thursday, July 19, 2018

Painting Like Jackson Pollock


This week we Painted Like the Masters - always a favorite!

Reflection of the Big Dipper, 1947
JACKSON POLLOCK

"I want to express my feelings, not illustrate them."

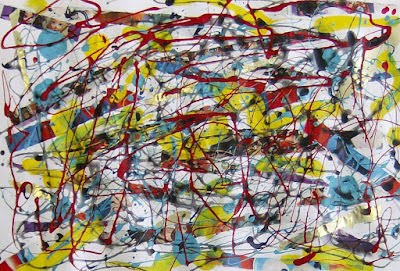
On Monday we painted like American artist Jackson Pollock. Nicknamed "Jack the Dripper," his Drip and Splash method of painting included pouring, dripping, splashing, splattering, swirling, flinging, and flicking all sorts of paint onto huge canvases laid flat on the floor of his New York studio. He was the leading force behind the abstract expressionist movement, and considered one of the 20th century's most influential artists. His radical abstract style redefined the relationships between line and color and how a canvas can be filled with expressive imagery. Because of his active style of painting, he was also known as "Action Jackson."

To create our Pollock-style action Paintings, we first covered the studio floor with a large drop cloth. We experimented with latex paint, acrylic paint, and tempera paint to create our masterpieces. We used long handled synthetic brushes to drip, throw, swish, and fling the paint onto large sheets of paper and poster board. 

The latex paint seemed to work the best because it drops from the brush slowly, leaving long stringy lines on the paper. We also liked the glossy surface of this kind of paint after it dries. 
This latex painting, titled "Halloween," is defined by its exciting shapes and seasonal colors. I think I see candy corn swirling around in it!

We tried thinning some of our tempera paint to an almost watercolor consistency, which was great for splattering! 
Abbi also tried spraying with water and allowing the paint to drip and blend for an interesting affect. Then she splattered some more!


We also tried incorporating other types of elements into our 'action paintings,' including collage and stamping paint with sponges and scrubbers. This one, titled Animated, includes collaged images of animated movie, toy, and game characters. 

Here are a few more of our Jackson Pollock-style action paintings. Super fun and super cool!


Saturday, July 14, 2018

Zebra Collage


During Animal Week, we made a Zebra collage!


We drew the zebra first on white construction paper. That was tricky, but we did it!


Then we cut lots and lots of strips of scrapbook paper to make the zebra's stripes. We cut most of them a little bit too long so they stuck out a little bit over the lines. 


We glued them on, then we cut out our zebras and used a Sharpie to add some details. Finally, we glued them onto a piece of colored card stock.


Friday, July 13, 2018

Amazing Animals!

Creatures of Earth

The earth is just a speck in space.
Yet such an awesome, wild place,
For creatures great and small!

People of the earth beware!
It’s up to you to love and care
For creatures great and small.

Understand and nurture them.
Save their homes and be a friend
To creatures great and small.

Animals and birds and fish
Insects, reptiles too;
They need us to protect the earth
For creatures and for you!


This week our camps and classes celebrated "Amazing Animals!" 

And, we celebrated children's DRAWINGS in the process. 


Drawing is a child's very first attempt to communicate through the act making marks on paper (or walls or tabletops or sidewalks, etc.) 


It should be obvious that children don't need to be taught to draw! (As they get older, they may want to learn the "tricks" for drawing better, but they figure out drawing as soon as they are able hold a writing implement.) 


In addition, each child develops his or her own drawing system and style as s/he works through the process of expressing their world on paper. 


Children's spontaneous drawings, although often ignored, are often incredibly awesome insights into their interests, knowledge, and how they make sense of the world. 


For this project, we took turns naming random animals to draw on an 18" x 24" sheet of paper. I did not teach them how to draw any of the animals.  


Most of them immediately dove in to draw each one.I was amazed at the accuracy of their drawings! 


Once in a while they were 'stumped' about how to start a drawing, which merely means a lack of information. We found photos of the animal in our resource files or we googled it. Needing more information about something is always a good thing!


We fit our animal drawings into our composition like a puzzle. Proportional sizes did not matter. 


The drawings were completed in a full 3-hour class period. During the next class, we defined each animal by adding colors, patterns, outlines, fur, scales, feathers, and facial details.


Finally, we filled in the background very loosely with soft pastels, which were rubbed and blended for a soft, colorful effect. Then we mounted our drawings on a piece of black poster board, leaving a lovely black border around the outside of the artwork. Each child also got a matted copy of the poem above to display with their masterpiece!
Animal Menagerie, by Abbigail
Animal Menagerie, by Tylee
Animal Menagerie, by Abbey
Our students will continue practicing spontaneous drawing through games and imaginative / story-telling activities suggested in Marjorie and Brent Wilson's classic book, Teaching Children to Draw.


Saturday, June 30, 2018

Bottle Top Grid Art!


Our ART Adventurers made these awesome recycled art projects using ordinary bottle caps!

We only had two hours, so our 3 x 3 grids contained nine squares. Adding just one row each way would mean 16 squares, so nine squares was just right.


We started by dividing a 9" x 12" piece of watercolor paper into twelve 3" x 3" squares and painting each section with acrylic craft paint. We mixed each color, creating our own tints, tones, and shades. 


After the paint was dry, I cut the best portion of each 3" x 3" painted square into a 2" x 2" painted tile. The artists then drew a quick square around each tile with oil pastels using one or two analogous or complementary colors. 


The artist then selected her favorite 9 tiles and carefully arranged and glued them to a piece of 6" x 6" corrugated cardboard.


Now it was time for the artist to select nine bottle caps and glue each to the center of a tile with white glue. Some bottle caps were glue on upside down, some right side up. Some were also painted prior to gluing. We found it easiest to smear the glue onto a plastic lid to dip the lids an other items into. 


Now the fun part!

Our artists thoughtfully selected marbles, trinkets, jewels, beads, shells, tiles, and other treasures to glue to their bottle caps for tiny surprises hidden throughout the artwork. 

Wacky Robotic Hands


On the last day of this week's Wacky Art Camp, we made these amazing Robotic Hands! 

This was such a great S.T.E.A.M. MakerSpace project! The kids were so excited about using ordinary materials to make something really AWESOME!


Materials:
Corrugated cardboard, tempera paint, small zip ties, straws, string, small fun foam shapes, and hot glue.

Tools:
Pencil, paint brush, shears, craft knife, old credit card, hot glue gun.


You can find the step-by-step instructions for making this robotic hand on Youtube right here.


This one needed a cardboard brace attached to it after it was painted, which could easily be transformed into a robotic battery pack by its creator and a few colorful Sharpies.