Saturday, July 27, 2019

Picasso's Guitars

Still Life with Guitar, 1921

There is no abstract art. You must always start with something. Afterward you can remove all traces of reality.     ~ Pablo Picasso

We think of Picasso as an abstract artist or a cubist (or both). In reality he was a very proficient artist who chose to play with his subjects as a child would. He said, "It takes a long time to become young," and it is obvious that he was constantly working on it!

I decided on a Picasso-style guitar because it is a familiar, popular subject, and because he painted many guitars, mandolins, and violins, all in the style you see above. 


Also, this project could easily be created as a collage, which gave us a break from painting. As Picasso style art, they could mix and match elements without worrying about making things match up or perfect or even or straight, etc. 


We drew nothing. We simply cut out or tore the shapes freehand and assembled all the parts.


We started by creating the guitar from two guitar-ish shapes that did not necessarily match up from different types of paper. We cut out a neck, and we glued the guitar together. Some of us  pretended to play our guitars before moving on.


We placed them on our substrate (14" x 18" poster board) and arranged other elements around and beneath them. Nothing was glued down until the composition looked interesting, balanced, and complete. 


After gluing, we added drawn elements and details, such as outlining, textures, shadows, and shapes - like zigzags, which gave some guitars an "electric guitar" feel. We used metallic Sharpies for most of our detail work. 

I think they are all awesome!

My sample

Our thanks to Meri Cherry for this very cool art project idea!

Friday, July 26, 2019

Drawing with Wire!

Wire Elephant, 1928

Alexander Calder drew with wire.

Calder (1898-1976) was an American artist most well-known for his kenetic mobiles and wire sculptures. He also painted, was a set designer, and he created massive public sculpture installations. He began his career as a mechanical engineer. 


Our campers focused on his animal wire sculptures. We looked at several examples and noticed that they appear to be 3-dimensional drawings made in space from wire. 
Cobra

To create our own, we drew several sketches of animals using just one long line from the beginning and back to the beginning again. We selected our favorite and used very thin wire to quickly trace our drawing with. This would give us a rough idea as to how much craft wire we would need for our sculpture. 

We then cut that amount of 18-gauge wire and bent it using a pair of needle nose pliers for sharp turns, twists, and tiny shapes. We made every attempt to turn a flat drawing into a 3-D shape. We also left a bit of wire poking down from the bottom of the sculpture for the base. 
Wolf
Cardinal

Then we selected a piece of wood and glued it to a flat plank for a base. We painted it, drilled a hole, and inserted the tip of the wire at the bottom of the sculpture. Then we added glue and we bent and adjusted the sculpture to fit down onto the base.

To an engineer, good enough is perfect. With an artist, there's no such thing as perfect.
             ~ Alexander Calder


Thursday, July 25, 2019

Vincent and his Sunflowers

Vase with Sunflowers (c. 1888)


Vincent van Gogh created a series of sunflower paintings using the same vase of flowers as his subject. As a result, the flowers look fresh in some paintings and rather faded in others.


He varied the background and table colors in each painting, and he signed each one in a slightly different position on the vase.


To recreate his Vase with Sunflowers, we first set up a vase of sunflowers of our own.


We noted the various textures in each flower and that van Gogh often used thick layers of paint to create similar textures in his paintings.

How could we create similar texture in our own paintings? Here's what we did.


First, we spread a layer of joint compound over a 9" by 12" canvas panel. Then, using various tools like palette knives and plastic "sporks," we created the composition of our painting using textures instead of colors, and we allowed it to dry overnight.


The next day we painted it with acrylic paint, working the paint carefully into all of the nooks and crannies. We found that we had to turn the painting in different directions to ensure that the joint compound was completely painted.  


First, we selected a color for our background, so that we could paint the flower petals in the foreground over the background edges.


We used stiff round bristle brushes to dab the paint into the crevices of the textured joint compound.


We painted each flower one at a time. Then we went back and added details to each flower. We completed the table and painted and outlined the vase.

Finally, we signed our first name on the vase, just the way Vincent signed his. 


Important: If you try this project, be sure to use prepared joint compound (not powdered) 
so that it will not be inhaled. In addition, everyone should wear vinyl gloves 
to keep the compound off the skin. 


Wednesday, July 24, 2019

Van Gogh's Irises

Irises (1889)
What would life be if we had no courage to attempt anything?
              ~ Vincent van Gogh

Vincent van Gogh painted a series of irises, including this  well known painting, in the last year of his life. The painting is such a wonderful example of van Gogh's work that I decided to provide my new students with a chance to paint it as we did in our 2017 Summer Art Camp.


To create our paintings, we taped a piece of heavy 12" x 15" watercolor paper to a watercolor board.  Then, we drew our irises using a black crayon and with the help of a drawing guide, How to Draw an Iris in 5 Easy Steps
After adding the stems and leaves to our irises, we began painting using only our fingers! This eliminated the need for water which could dilute the bold, thick colors so prominent in van Gogh's work.  


We double or triple dipped our fingers to mix colors, or we used different fingers for different colors, or we wiped them off to switch to new colors. Easy-peasy!


We started with the background colors using only green, yellow and blue.


Then we added a few tiny flowers using complementary colors. We chose a color for our irises and painted them in various tints, shades, and tones of that color, one petal at a time; and we painted our stems and leaves. 


Finally we added the soil using short strokes of orange, burnt umber, and yellow. The we went back our our irises and added the bright yellow "beard."


Once the paintings were completely dry, we outlined the flowers again while also adding some a few details to the background in black crayon or black oil pastel.


Then we carefully removed the tape from the paintings to reveal a professional-looking white border. 


Our young artists seemed very pleased with their beautiful iris artwork, shown here:

(Note: This piece is unfinished; the artist planned to
complete the final outlining process at home.)

If you hear a voice within you say 'you cannot paint,' then by all means paint, and that voice will be silenced.
                                                                                                   ~ Vincent van Gogh


Tuesday, July 23, 2019

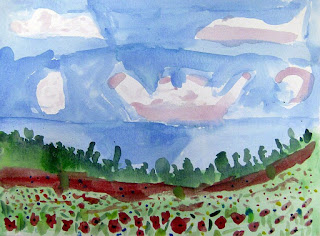
Monet's Poppy Fields

Wild Poppies Near Argenteuil (1873)
Claude Monet was known as a prolific painter. His most famous paintings might have been those of the Japanese footbridge and waterlilies, but there are so many others! 

One of my personal favorites is this blooming field of poppies.


Poppy Field in Giverny

I thought would be fun for our young artists to paint a field of bright red poppies. 

For simplicity, we would complete this painting in watercolor (9" x 12 "). 


First, we lightly painted a horizon line in blue, and completed the blue sky. We left white areas for clouds, adding purples and pinks like Monet often did in his clouds.  


Then we filled in the bottom portion of the painting in light greens, and we painted a dark tree line along the top of the horizon to indicate perspective and distance. 


We then added distant flowers, which were really just long horizontal streaks of red or pink, because these flowers are so far away.


The closer the flowers are, the larger they look, so that is how we painted them. Those at the bottom of the paper are so close we can see some of the black centers inside them.


The last step is to add grassy details to the field of poppies. We would be able to clearly see green blades of grass between the poppies in the lower portion of the painting.
My sample
The poppy field below was completed by a four-year-old. We used liquid tempera paint and poster paint dabbers (dotters?) on large sulphite paper for this one. Because young children like to paint BIG, right?

This project is loosely based on a lesson found in Painted Paper Art: Monet's Fields of Poppies.