Friday, October 22, 2021

TEN Amazing Self-Portrait Ideas!

Self Portrait Art can reveal many things:
How do I see myself? How do I wish to be seen by others? How might I look in the future? How could I change my look if I wanted to? Who am I?

Young artists like to create self portraits that look a certain way without focusing too much attention on challenging endeavors such as correct facial features and proportional body parts. They are much more interested in projecting an image of themselves that pleases them personally.

Instead of saying, "draw a picture of yourself," I like to provide creative ideas and imaginative opportunities to create self- expressive portrait art. This can allow the child to live vicariously by experimenting with different 'selves' - or self images. Or perhaps different looks or appearances. Different ways of being

This can even work when learning about the master artists. For example, a self portrait created in the manner of Marc Chagall (see lesson below) would result in something quite different than a Picasso inspired self portrait! 

Below you will find TEN different ways to inspire expressive self portrait artwork. Grade recommendations are suggestions only: most of these lesson ideas can be adjusted to the creative abilities of any young artist. So let's get creative and have some fun with expressive self portrait art!!!

Pre-school through lower elementary grades:

Super Me!  (ta da!!!)

Guess what? Young children REALLY like the idea of being a super heroes! (Who knew?) Imagine... "The Burp" saves the day!!!

Our superheroes were drawn with Sharpies. Then the backgrounds were painted with watercolor. The idea was to create starbursts, starting with a dot in the center of the page and painting "lines" from it to the edges. Or not. While they painted, I cut out the figures. Then the portraits were glued to the dried background. 

Here's a similar project using bleeding tissue to create the colorful background. And this one involves a variety of mixed media, but is oh-so-simple, even for the youngest artists! (I think it's adorable!)


These portraits involve a bit more creativity and planning. The full figure portrait is drawn, colored, and cut out.  Then the artist asks, "what will I be doing?" Jumping rope? Swinging? Skateboarding? Dancing? Once they decide, they will choose a few additional elements needed to complete the artwork. They might use scraps of yarn and fun foam to create a swing, or shiny glittery papers for an sparkly dance background.  

Finally, they'll attach their surprise 3D elements to the artwork and then place themselves at center of the scene! 


What kid doesn't want to make a life sized 'twin' of him or herself?

We made these as a "Try It" Makerspace Challenge. Our artists found out right away that this would be a cooperative effort. After all, once you lie down on the big sheet of butcher paper, you can't really draw around yourself - you need help!!!  

As these life sized portraits are drawn and then painted, decisions are made regarding facial expressions, skin tones, hair styles, accessories, clothing fashions, and colors. 

Collage elements can be added for additional awesomeness, such as shiny papers for jewelry and yarn for hair.

Now display your 'twin' on your bedroom door to watch over things while you are away!


Elementary grades:

Me and My Shadow  

This "3D" self portrait is deceptively easy to create! 

The artist first draws a picture of him/herself doing something: it's all about action! After the drawing is completed and colored in, it is placed on top of a piece of black paper and taped here and there to keep the pieces together. Now the artist carefully cuts out the figure, cutting through both sheets to create a duplicate black figure. 

The black shadow is then glued down to a piece of construction paper. Then the portrait is glued over the shadow, being sure to offset it somewhat so that the shadow can be clearly seen behind the figure. 


Mini-Me!

Kids love creating these mini versions of themselves! 

Call them mini-me's, avatars, personal cartoon characters, self animations, twins, or personal clones... whatever they are, they'll love this project! 

Learn how to make them on our previous weblog post - and have fun!!! 


Flying Me! 

What child hasn't dreamed about flying?

These paintings are created in the dream-like style of surrealist Marc Chagall, which often contained dreamy scenes and imagery from his childhood fantasies - of flying, floating, and soaring through the sky. 

This mixed media painting is a favorite from our Paint Like the Masters summer series. See our previous weblog post to help your child create his or her own flying self!

Minecraft Me

Any kid who loves Minecraft might like to become a Minecraft character too!

This fun project can be created in two or three (virtual) dimensions depending upon the skill level of the artist. It can be found at art projects for kids.org. We have also created a printable pdf with additional instructions for adding a 3-D look to your Minecraft self!

This project uses graph paper (printed or your own) and might involve a teeny little bit of math... but no worries - it's easy and fun!

Middle school and high school:


Lego Me

"How would I look as a LEGO person?" That's a question that can be answered with art

We made these amazing Lego people by first inspecting a few Lego people from our MakerSpace Lego collection. Then we designed and created our own personal Lego characters. 

This mixed media, toy-based self portrait art project was so much FUN, even our older artists loved it - including me!

Pop Art Me

Here is another 'Paint like the Masters' art lesson, this time featuring the 1960's pop art of Andy Warhol. This is a digital art / creative collage project, which older kids can really get into!

To create our pop art, we used fotoflexer to create our grid of Warhol-like portraits, which we printed out for our collage. We've since found an easier-to-use app for this, called convertimage.net.

Next, you'll collect and cut out your initials from everywhere, and add them, along with any other chosen images, to your collage! Check out our previous weblog post for all the details.


Manga Me 

Manga are Japanese style comic book characters that are very popular with older kids who enjoy drawing. They were originally produced in black & white as daily comics, but they can be modified with color and more detail, as though creating anime characters, which are used in animation.  

The goal is to study this type of character drawing to create a manga-style self portrait, which in turn could be used as a personal avatar!

You can learn more about creating manga character portrait art at deviantart.com, where you'll find everything thing you need to create your own Manga style personal avatar!


BONUS PROJECT!  Take an imaginary trip - and then take a selfie!

First, print out this pdf of fun selfie frames (four in all). Young artists can then create their own 'selfies' by drawing themselves in the frames and adding any type of background they wish - the Eiffel Tower? The Great Pyramids of Egypt? The bottom of the sea? Outer space? Remind them to wear the appropriate attire - such as a wetsuit & goggles or a spacesuit - for their chosen destination!

Saturday, August 14, 2021

Awesome Abstract Art!


Every summer I SO look forward to August art classes. Why?

Because it's Abstract Art month at the Blackfoot Art Center! Our young artists have learned that abstract art is FUN to look at and super FUN to create. 

What could be better than that?


These layered abstract paintings were created on heavy 140 lb watercolor paper. The format is  relatively 
large, 18"x18," which kids love! 

Prior to painting our masterpieces, I taped the edges to create nice white borders. 

We began by cutting painted paper scraps and collaging them to the surface. 

Then we blocked in the basic design with tempera paint using warm or cool colors. 

We then added more cut painted paper, then painted again using the same or the opposite color palette. We also added neutral colors - greys that we mixed by combining two complementary colors and white.

The final step was adding black tempera for a bit of definition and contrast. 

Some artists added a lot of outlining and detail work.


Others used black to add completely new design elements and patterns right over their painted composition. 

Either way works... there is no right or wrong way to create abstract art!


After everything dried, we removed the taped border and...   WOW!


Yes, this piece is mine. I made one too. How could I resist??

                     Our thanks to the Art Bar for this fabulous                        ABSTRACT art painting idea.

Friday, July 30, 2021

Let's Build a Treehouse!

Have you ever built a treehouse? 

Or played in a treehouse? 

I built a treehouse when I was 12. I found a giant tree in a vacant lot near my house and claimed it as my own. I hauled all the scrap wood and cardboard I could find to my new construction site and worked every day until it was done. Then I invited my sisters over for a visit.

As you can see in this photo, my abode in the trees was magnificent!

I think building a treehouse is a childhood essential - at least for us creative types, so I asked my young art students if they had ever built a treehouse. Unfortunately, they had not. So instead, a few decided to do the next best thing. They would build a MODEL of an awesome  treehouse! 

Using shears to cut a cardboard shape

Each artist started with a sheet of cardboard and a simple template of a strong tree, such as an elm. I designed this first for them to trace because, by golly, you don't normally have to build the tree - you just find a good one to build the house in!  Anyway, they traced it twice on the cardboard and cut it out, mostly using shears and occasionally a canary cutter. (No craft knives necessary, and definitely not scissors - they are not strong enough.)

The two shapes were then slit halfway down the centers: one halfway up from the bottom and one halfway down from the crook of the branches. Then we inserted the slits one into the other to create a (very sturdy) free standing tree. This is called the slot technique for attaching cardboard pieces. 


They wanted to those treehouses in there right way, so they cut the shape of the floor, added slits, and inserted the trunks through the slits. Then they made roofs and walls and doors and windows to complete the treehouse. 


Artists also wanted to add leaves or canopies to their trees, so they cut cloud-shapes, which they slit and pushed down over the top branches.

This is a round tree house, being created by a brother and sister team. 

You can see they have added a little green into their shady canopy and a rope ladder for easy access. 


This treehouse includes a waterslide and a swimming pool full of toys! What a 'cool' way to get out of the house, right? 


And if you don't feel like getting wet, there's always the tire swing to hang around on.  

Cardboard is such a versatile medium, you can make pretty much anything with it! 


This artist made animals with cardboard. She started by drawing an cutting out the body shapes and U-shaped legs. Then she painted everything. 

When they were dry, she cut the slits and inserted the legs into the bodies. Then she glued on googly eyes, and took them home to add more details, like tails and manes made from yarn. 


Here's a giraffe that she made, along with the zebra and an elephant for her animal menagerie. 


If you have a little time and you want to get serious about working with cardboard, try creating a small 3D stand-up scene such as this Butterfly Fish swimming along through a coral reef. I made this one, and it was so much fun! As an art teacher, I often feel so lucky to be 'allowed' to think and act like a kid again. Why not give it a try?

Monday, July 26, 2021

Make Your Own Skee Ball Game

This month our Art Adventurers made backyard arcade games from cardboard, so I wanted to make a game too! (I know, I'm just a big kid!)  Since we have several large sheets of cardboard I decided to make something that needs a long smooth ramp. So I made a skee ball game!  

It was a hit with the kids and easy to make too. My design is assembled with edge slot inserts and tabs & slots; not taping or gluing. That way you can easily disassemble it anytime and store it until you want to play again. (This game does take up room.) 

Want to make one of your own? Here's how!

You will need:

ü Cardboard - a nice sized sturdy box plus one unblemished and unbent sheet, like the side of a large appliance box

ü Colored duct tape, for color only

ü Clear packing tape and masking tape

ü Pencil compass (you can make one) 

ü Sharpies or a printer, and colored paper

ü Sharp utility knife

üRuled metal T-square (mine is 30 inches long) and/or a yardstick

You'll start by creating the game face. You'll need a nice smooth sheet of cardboard, cut to about about 18" (width) by 30" (height). I use a metal T-square and a sharp utility knife to cut nice straight edges. Be sure to protect your work surface. I use a large piece of chip board topped with a thick sheet of cardboard as a cutting surface.

Now you will trace your circles using your pencil compass. (Or you can simply trace round objects that are about the right size.)  Find the approximate center of the board and make a dot. Then use your compass to make as large a circle as you can fit within your game space. Mine is 16" in diameter. Then make a smaller circle inside the first, like a bullseye. Mine is 10" wide, leaving a nice 3" space outside of it. The third circle is then drawn in the center. Mine is 5" in diameter, leaving a 2.5" space around the outside.

Next, you will cut 3" strips that are long enough to bend around the circumference of each circle. How do you find the circumference measure of each circle? Well, you can measure it with a ruler - which is not easy. What is easy is to do a simple math problem (this is where math actually does come in handy in real life). Simply multiply the diameter (the line across the circle from one side through the center point to the other side) times pi (3.14) to get the circumference, then cut your cardboard that length. Best to make it a bit too long - then you can always cut off the excess.  

Here's the formula: Cℼd

My largest circle has a 16" diameter. So I multiplied 16 x 3.14 (the value of pi) for a circumference of 50.24 inches. I cut the first strip 52 inches long, planning to cut off the excess after attaching it to the board. Do the math with all of your strips and cut them out, being sure that you cut across (not along) the corrugated lines in the cardboard so that the strips will bend easily.

Your rings need only be 2 inches wide, so now you will draw a line one inch from one of the edges of your 3-inch strip to create a two inch strip. The remaining one inch strip will be used to create tabs. Every five inches or so, draw a short line from your 2-inch line to the edge, like this (of course your strips will be longer than in this drawing):

  2 inches

  1 inch


(You'll make narrower tabs in your inner circles that are also a bit closer together.) Remove the cut out areas and along the horizontal line at the top of each tab make a small snip on each side so sides of each tab can be bent out slightly (which we will do later).

Now you will bend each strip into a nice neat ring. Let the corrugation in the cardboard help you as you carefully bend the strip until the ends meet. You can tape them together with clear packing tape, at least for now. 

Place the ring, tabs down over your drawn circle on the board and mark where each tab touches the circle. Be sure to mark the entire length of each tab so you will know where to cut your slots. 

Next, place your board on your cutting surface and cut a slit where the tab markings are. I cut my slits just a bit shorter than the markings so the tabs can be folded slightly and stuffed through, then flanged out in the back to secure the rings so they won't fall out.  

This is how the rings and tabs look after they've been attached.  Look Ma! No tape!!!

Now you can draw your scoring numbers directly on the game face, or on pieces of paper (easier) to be attached. Or you can print them out or use die cut numbers and letters, which is what I used on brightly colored card stock. I also laminated everything. If you don't have a laminator, just use clear packing tape if you like the laminating idea. Then just attach each piece to your game with a rolled up piece of masking tape.

Next, we will create two sides to hold our game face in place. I used two more sheets of cardboard about the same size as the first one. Then I cut the bottoms at a slant so the game will lean back. The front edges of these are 29" and the back edges are cut 5" shorter to 24".  Now you will cut two 1 inch strips of very thick cardboard for the game face to rest on and glue them to the sides. (You can glue several strips together to make them thicker if needed.)

You will now cut some braces to put the sides into a standing position, making sure the cardboard game face rests are leaning towards the back of the game. 

Here I have made two braces, each about 20" long and a couple of inches wide. Attach them using slits cut into the game sides and cut near each end of the brace. These make strong connectors, but are also easily disassembled!

Place the game face onto the thick carboard rests and make sure everything fits. Then make additional braces to keep your game from tipping over. 


I made these three braces and they seem to work pretty well. Top brace (with sign), middle back brace (very simple), and bottom front, which is bent to hold the bottom of the game face when it is slipped into place. 


This is what I decided to do for the top brace, just to securely hold the sides in place but also easy to remove when disassembling the game. I know, kind of funky, but hey! They work!


This is what the back looks like when it's all put together. 


Now all you need to do is build your ramp! I used a piece of cardboard cut to about 28" by 55", but you can use what ever you have available. I wanted a long ramp for plenty of ball rolling fun!

I cut the upper end of the cardboard ramp to the same width as the game face so that it could fit into bottom of the frame. I cut off upper the corners of the cardboard about a foot down, then left the remaining cardboard to be folded up to create side rails that will keep the balls (somewhat) on the ramp and in play. 


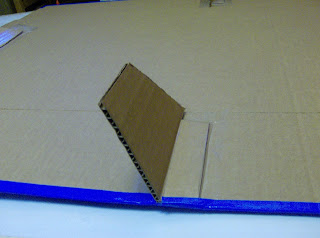
Then I folded the ramp up and then down to create the "bump" that sends the balls flying into the scoring rings. Just use a scrap of cardboard and packing tape to hold it in place.

Now you can go ahead and fold up your side rails, which is tricky because you are folding against the grain. Here's what to do:


Draw a line on the bottom of the cardboard where your fold will be. Now along this same line, drag the edge or tip of a pair of scissors to create a good indention. It's okay to cut into the cardboard slightly. Now bend the cardboard down over the edge of your work surface. You can also add a few braces to the side rails to keep them from folding flat while in play.


Now you can flip over your ball ramp and decorated it at will with a few strips of  colorful duct tape! I found that it actually makes scoring easier by placing a piece of tape right down the center of the ramp. I also wrapped a piece of red tape around the front end of the ramp to protect it from being torn up and to as a reminder not to step over the line!


Use small heavy balls for this game. We collected all the balls we could find that had a little weight to them. Players could select any 3 (or 4 or 5 etc.) balls for their turn. 


Of course, you can make up the rules as you go!


Saturday, July 17, 2021

Backyard Games


This month we are making, building, and constructing things from cardboard. You can make anything out of cardboard!!! 

It's sturdy, strong, and abundant. You can paint it, mark it, tape it, glue it, and attach it using simple tabs and slots and brads (for moveable parts). 

And it's free!


We happen to have several large sheets of cardboard, and kids LOVE making things that are BIG - like life size! 

So we started out by making arcade games, similar to our cornhole game that we play in the backyard.


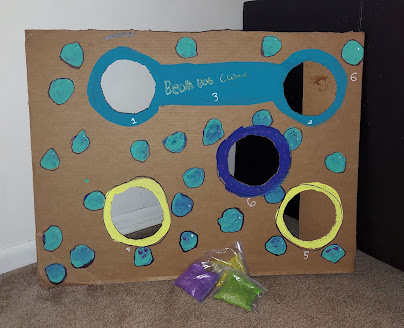
First we sketched out some design ideas with pencil and paper. The the kids traced lids where they wanted the holes for beanbag or ball toss games, and I cut them out with my Canary Cutter. (If you work with cardboard, you gotta get one! Safe for middle schoolers and older to use themselves.)


Then they painted their games and we placed them out in the sun to dry. It was a windy day so we had held them down with flower pots.

While the games dried, we made quick no-sew bean bags. We cut colorful plastic party table covers into rectangles, folded them in half, taped the two sides, filled them with pinto beans, taped the tops, and put them in snack size zip lock bags. Even the youngest could do it!


Some games required balls, which we also had on hand - a great garage sale find! The kids took home the number and colors of balls they needed for their game.


This mini basketball game definitely needed balls to play it properly. 


Our games can be played indoors or out. 

The biggest challenge was getting them into the car for the trip home!