Tuesday, March 22, 2022

Cherry Blossoms!


These cheery little vases of cherry blossoms remind us that spring is here!

These are tempera paintings on grey paper, painted in the style of early 20th century Russian artist Natalia Goncharova. 

You can learn more about how we did them on our earlier post, Cheery Cherry Blossoms! or you can download detailed instructions (pdf) from Painted Paper Art.

Monday, March 21, 2022

More Dragons!


Fantasy subjects such as, (and especially!) DRAGONS, are a popular art subject among many young artists.


We created these dragons within a border filled with symbols and patterns. 


The dragons were sketched in, painted with watercolor, and outlined with ink. Then details were added using Sharpies, metallic markers, and glitter pens. Finally, a background was painted in with liquid watercolors.
Take a look at our earlier Dragon post to see more spectacular dragon artwork!

Saturday, March 12, 2022

More Animals in Snugly Sweaters!

Wolf in a Snugly Sweater
 

Our last winter art lesson of the year:

Animals in Snugly Sweaters!


So cute, and such a great art lesson, too!

Students learned to observe and sketch wildlife and how to work with ink to create facial details and furry textures.


Then they designed a nice warm winter sweater for their furry woodland friends!

For more details and how-to's, see our original weblog post, Animals in Snugly Sweaters.


Squirrel in a Snugly Sweater
Bear in a Snugly Sweater


Thursday, March 10, 2022

Beautiful Snowy Alpines!

These mixed media Snowy Alpines are so gorgeous! 
        You can see how we made them on our original Alpine Trees         weblog post. For all ages, even younger artists!

Friday, March 04, 2022

We Love Penguins!


Who doesn't love Penguins?


Here's a cute little penguin saying hello!


This penguin is having fun as she hops and dances around in the snow!


This momma penguin watches over the little ones as the snow swirls around her. 


All of these penguins were created on white sulfite paper with charcoal, pastels, and black ink, then cut out and glued to a painted and splattered background.


You can find our original posts about making penguin art here and here.

Friday, February 25, 2022

Frolicking Snowmen!


What do snowmen do at night? 

They have FUN!

Skiing, snowboarding, tubing, and sledding! 


Rollicking, windblown snowmen, top hats and snowballs flying through the freezing wintery night!


Ahhh! Is this paradise? 

What could be better for a snowman family than a house made of ice?


These 12" x 18" artworks consists of soft pastels and pastel pencils on blue construction paper. See our original post, Snowmen Having Fun for details about how to create this artwork.

Friday, February 18, 2022

More Painted Hearts


This week in honor of Valentine's Day, we created these fun Painted  Hearts! 

This Paint Like the Masters lesson has grown to be one or our favorites. Our hearts are (loosely) painted like those of Jim Dine, a contemporary American artist who has painted oodles of colorful, playful abstract hearts,  many of which are gigantic!

Most of our hearts were painted on small  7-1/2 by 9 inch poster board, which was great because it allowed us more time to paint more hearts! 


We used liquid tempera paint for these heart paintings, but this project also works well with cake temperas, watercolors, and oil pastels. 


You can also go with mixed media; you can start by roughly outlining with oil pastels, then adding the paint of your choice. 


The main thing is to be playful and have fun making these awesome painted hearts!


Check out this step-by-step painting lesson in our original 2020 post: Painted Hearts. And here's a printable step-by-step pdf of this lesson. Have fun!

Wednesday, January 19, 2022

Celebrating Polar Bears!

Who doesn't love polar bears? 

During the past few years, we have created a variety of polar bear-themed works of art to celebrate International Polar Bear Day on February 27. 

If you love polar bears as much as we do, you might want to try some of these polar bear art ideas yourself!


Great Big Polar Bears!

Our preschoolers were so excited to paint these BIG polar bears! All we needed was 22" x 28" blue poster board, black and white tempera paint, water, a big flat brush for the white paint, and a round brush for black details and outlines. 


Mixed Media Polar Bears

These fuzzy little polar bears were created using chalk, soft pastels, oil pastels, a splattered watercolor background, and collage techniques. 

Each little bear has a unique personality!


Polar Bear Mommas

These polar bear mommas and cubs are so sweet, and also colorful! We discovered reflected colors in the fur of polar bears and used our artistic license to show those colors. Fun fact: polar bear fur actually has no white pigment at all; each hair is hollow. Look closely and you'll actually see all sorts of reflected colors in polar bear coats, from oranges and pinks to yellows, blues, and violets.


Polar Bears in the Arctic

These polar bears are wandering the Arctic under the Northern Lights, which are made of blended soft pastels on black construction paper. We completed the background and while it dried we drew our bears, cut them out and glued them into their cold arctic homes.


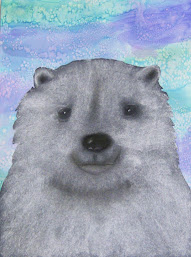
Polar Bear Portraits in Soft Pastel 

Our homeschoolers created these furry polar bears with white soft pastels on black construction paper.  Then they cut them out and glued them to icy winter backgrounds that were made with wet-on-wet watercolor techniques and salt.


We hope you'll celebrate polar bears with us through your art! You might also want to consider supporting wildlife conservation organizations, which work hard to save some of the world's most endangered species - including these amazing arctic mammals. 

Friday, October 22, 2021

TEN Amazing Self-Portrait Ideas!

Self Portrait Art can reveal many things:
How do I see myself? How do I wish to be seen by others? How might I look in the future? How could I change my look if I wanted to? Who am I?

Young artists like to create self portraits that look a certain way without focusing too much attention on challenging endeavors such as correct facial features and proportional body parts. They are much more interested in projecting an image of themselves that pleases them personally.

Instead of saying, "draw a picture of yourself," I like to provide creative ideas and imaginative opportunities to create self- expressive portrait art. This can allow the child to live vicariously by experimenting with different 'selves' - or self images. Or perhaps different looks or appearances. Different ways of being

This can even work when learning about the master artists. For example, a self portrait created in the manner of Marc Chagall (see lesson below) would result in something quite different than a Picasso inspired self portrait! 

Below you will find TEN different ways to inspire expressive self portrait artwork. Grade recommendations are suggestions only: most of these lesson ideas can be adjusted to the creative abilities of any young artist. So let's get creative and have some fun with expressive self portrait art!!!

Pre-school through lower elementary grades:

Super Me!  (ta da!!!)

Guess what? Young children REALLY like the idea of being a super heroes! (Who knew?) Imagine... "The Burp" saves the day!!!

Our superheroes were drawn with Sharpies. Then the backgrounds were painted with watercolor. The idea was to create starbursts, starting with a dot in the center of the page and painting "lines" from it to the edges. Or not. While they painted, I cut out the figures. Then the portraits were glued to the dried background. 

Here's a similar project using bleeding tissue to create the colorful background. And this one involves a variety of mixed media, but is oh-so-simple, even for the youngest artists! (I think it's adorable!)


These portraits involve a bit more creativity and planning. The full figure portrait is drawn, colored, and cut out.  Then the artist asks, "what will I be doing?" Jumping rope? Swinging? Skateboarding? Dancing? Once they decide, they will choose a few additional elements needed to complete the artwork. They might use scraps of yarn and fun foam to create a swing, or shiny glittery papers for an sparkly dance background.  

Finally, they'll attach their surprise 3D elements to the artwork and then place themselves at center of the scene! 


What kid doesn't want to make a life sized 'twin' of him or herself?

We made these as a "Try It" Makerspace Challenge. Our artists found out right away that this would be a cooperative effort. After all, once you lie down on the big sheet of butcher paper, you can't really draw around yourself - you need help!!!  

As these life sized portraits are drawn and then painted, decisions are made regarding facial expressions, skin tones, hair styles, accessories, clothing fashions, and colors. 

Collage elements can be added for additional awesomeness, such as shiny papers for jewelry and yarn for hair.

Now display your 'twin' on your bedroom door to watch over things while you are away!


Elementary grades:

Me and My Shadow  

This "3D" self portrait is deceptively easy to create! 

The artist first draws a picture of him/herself doing something: it's all about action! After the drawing is completed and colored in, it is placed on top of a piece of black paper and taped here and there to keep the pieces together. Now the artist carefully cuts out the figure, cutting through both sheets to create a duplicate black figure. 

The black shadow is then glued down to a piece of construction paper. Then the portrait is glued over the shadow, being sure to offset it somewhat so that the shadow can be clearly seen behind the figure. 


Mini-Me!

Kids love creating these mini versions of themselves! 

Call them mini-me's, avatars, personal cartoon characters, self animations, twins, or personal clones... whatever they are, they'll love this project! 

Learn how to make them on our previous weblog post - and have fun!!! 


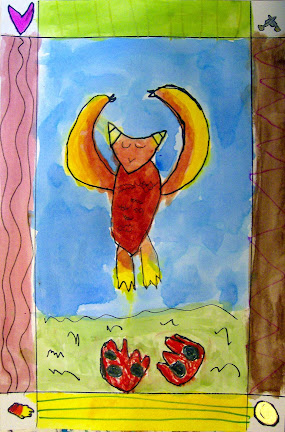
Flying Me! 

What child hasn't dreamed about flying?

These paintings are created in the dream-like style of surrealist Marc Chagall, which often contained dreamy scenes and imagery from his childhood fantasies - of flying, floating, and soaring through the sky. 

This mixed media painting is a favorite from our Paint Like the Masters summer series. See our previous weblog post to help your child create his or her own flying self!

Minecraft Me

Any kid who loves Minecraft might like to become a Minecraft character too!

This fun project can be created in two or three (virtual) dimensions depending upon the skill level of the artist. It can be found at art projects for kids.org. We have also created a printable pdf with additional instructions for adding a 3-D look to your Minecraft self!

This project uses graph paper (printed or your own) and might involve a teeny little bit of math... but no worries - it's easy and fun!

Middle school and high school:


Lego Me

"How would I look as a LEGO person?" That's a question that can be answered with art

We made these amazing Lego people by first inspecting a few Lego people from our MakerSpace Lego collection. Then we designed and created our own personal Lego characters. 

This mixed media, toy-based self portrait art project was so much FUN, even our older artists loved it - including me!

Pop Art Me

Here is another 'Paint like the Masters' art lesson, this time featuring the 1960's pop art of Andy Warhol. This is a digital art / creative collage project, which older kids can really get into!

To create our pop art, we used fotoflexer to create our grid of Warhol-like portraits, which we printed out for our collage. We've since found an easier-to-use app for this, called convertimage.net.

Next, you'll collect and cut out your initials from everywhere, and add them, along with any other chosen images, to your collage! Check out our previous weblog post for all the details.


Manga Me 

Manga are Japanese style comic book characters that are very popular with older kids who enjoy drawing. They were originally produced in black & white as daily comics, but they can be modified with color and more detail, as though creating anime characters, which are used in animation.  

The goal is to study this type of character drawing to create a manga-style self portrait, which in turn could be used as a personal avatar!

You can learn more about creating manga character portrait art at deviantart.com, where you'll find everything thing you need to create your own Manga style personal avatar!


BONUS PROJECT!  Take an imaginary trip - and then take a selfie!

First, print out this pdf of fun selfie frames (four in all). Young artists can then create their own 'selfies' by drawing themselves in the frames and adding any type of background they wish - the Eiffel Tower? The Great Pyramids of Egypt? The bottom of the sea? Outer space? Remind them to wear the appropriate attire - such as a wetsuit & goggles or a spacesuit - for their chosen destination!

Saturday, August 14, 2021

Awesome Abstract Art!


Every summer I SO look forward to August art classes. Why?

Because it's Abstract Art month at the Blackfoot Art Center! Our young artists have learned that abstract art is FUN to look at and super FUN to create. 

What could be better than that?


These layered abstract paintings were created on heavy 140 lb watercolor paper. The format is  relatively 
large, 18"x18," which kids love! 

Prior to painting our masterpieces, I taped the edges to create nice white borders. 

We began by cutting painted paper scraps and collaging them to the surface. 

Then we blocked in the basic design with tempera paint using warm or cool colors. 

We then added more cut painted paper, then painted again using the same or the opposite color palette. We also added neutral colors - greys that we mixed by combining two complementary colors and white.

The final step was adding black tempera for a bit of definition and contrast. 

Some artists added a lot of outlining and detail work.


Others used black to add completely new design elements and patterns right over their painted composition. 

Either way works... there is no right or wrong way to create abstract art!


After everything dried, we removed the taped border and...   WOW!


Yes, this piece is mine. I made one too. How could I resist??

                     Our thanks to the Art Bar for this fabulous                        ABSTRACT art painting idea.